Get started with Blup to build Flutter Apps
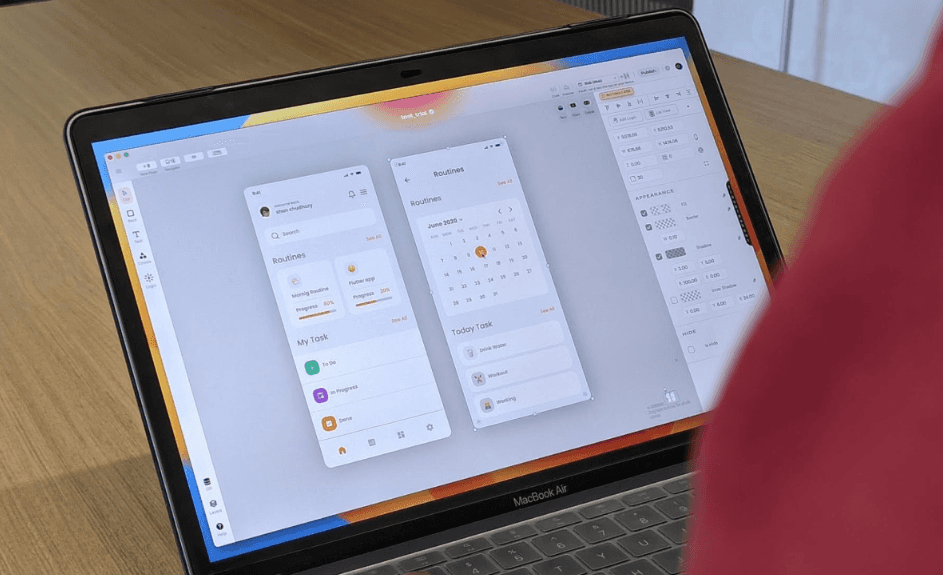

Greetings, my fellow Flutter Developers!
If you’re one of those who want to make your Flutter apps stand out among the vast ocean of competitors, Blup is the only thing you’ll need.
Want to create production-ready mobile apps with no & pro code, visual logic & immersive UI design all in one place?
🎊We present you Blup 🎊
Build Flutter apps with Blup
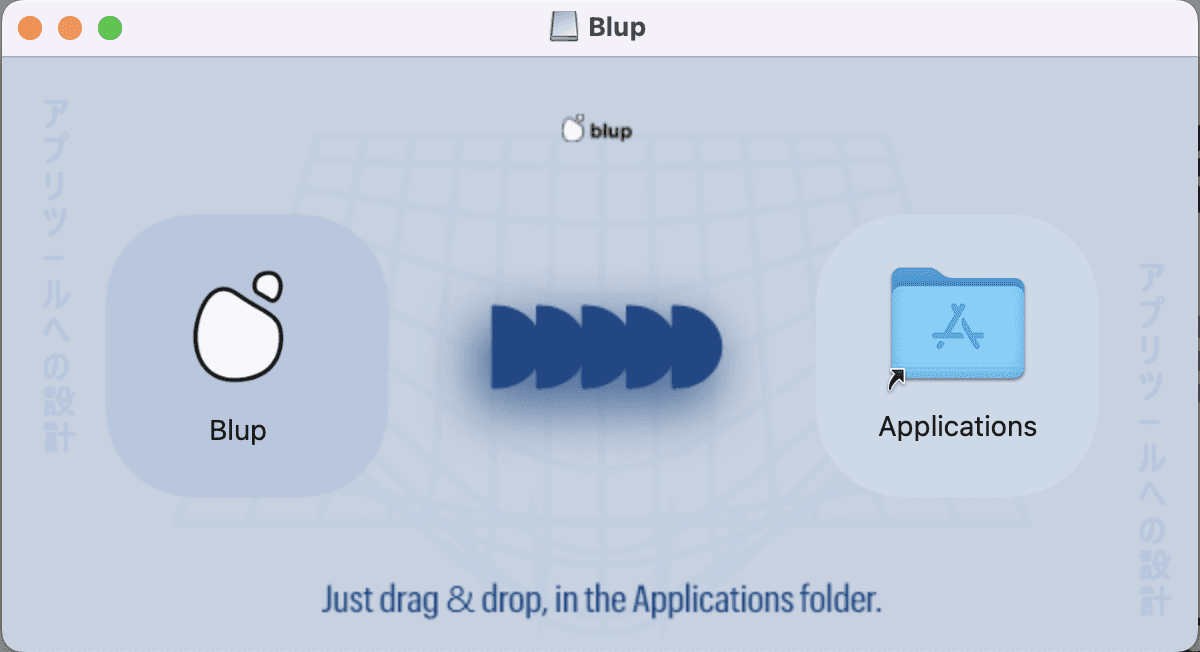
First things first! You must ensure that you have downloaded the Blup Setup on your Mac/Windows. If you haven't yet, go to blup.in/downloads now and it should auto-download the setup. Install the app as per the instructions on the screen. Voila! you're ready to get rolling!
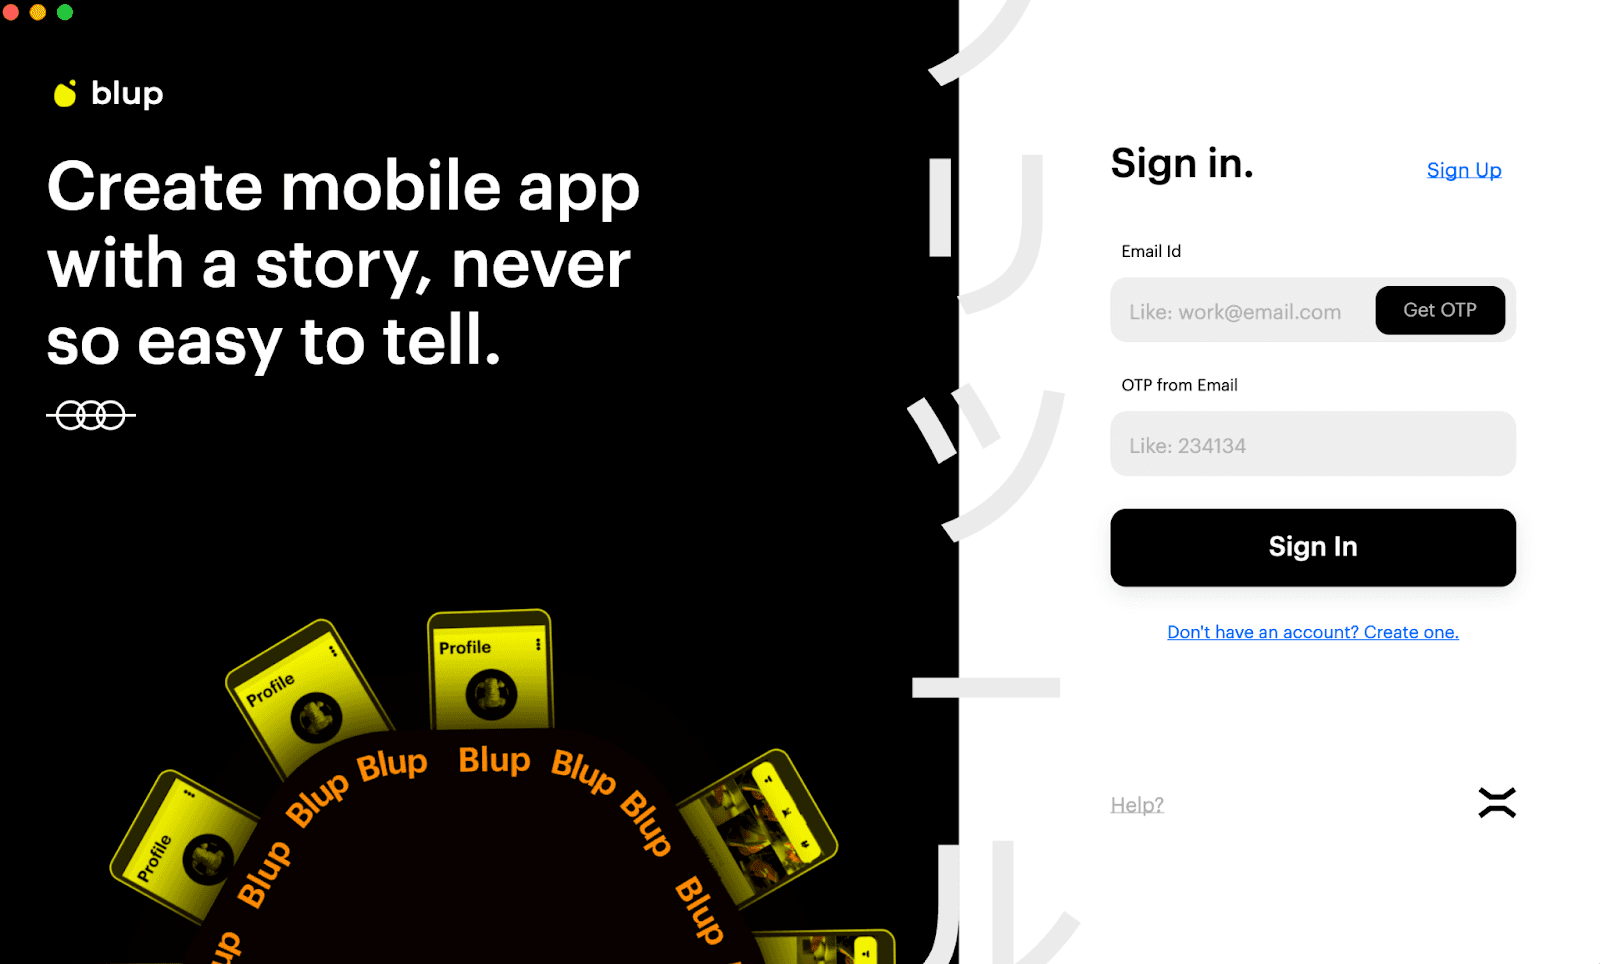
To begin using Blup, you need to register using an email first. Enter your name and email on the registration screen and hit "Create Account". For security purposes, you will have to authenticate the account via an OTP, which you will get on the registered email.
Drumrolls, you’re now part of the Blup community .🥁
Before you begin using the Blup interface, you need to understand the core steps of building the Flutter apps. Blup involves 4 major steps from getting your app designed to publishing your app.
These steps are:
Design
Logics
Backend
Publish
Let’s look at them one by one.
Design beautiful apps with #BlupDesigner
Blup is a no-code and pro-code platform that enables you to create app designs that are just as spectacular as those created by designers from scratch, while taking up less time and effort.
Flutter App Design is all about working with crucial elements and ease of UI features. This is where Blup Offers rich featured BlupDesigner. You can work on many panels like,
Status panel: present on the top.
Tools panel: present on the left side
Properties panel: present on the right side.
Pages: present in the center.
All these panels contribute in making an immersive UI. Let’s learn about them a bit more.
Status Panel
Status Panel of Blup is where you get access to projects, new pages, guidelines and many more.
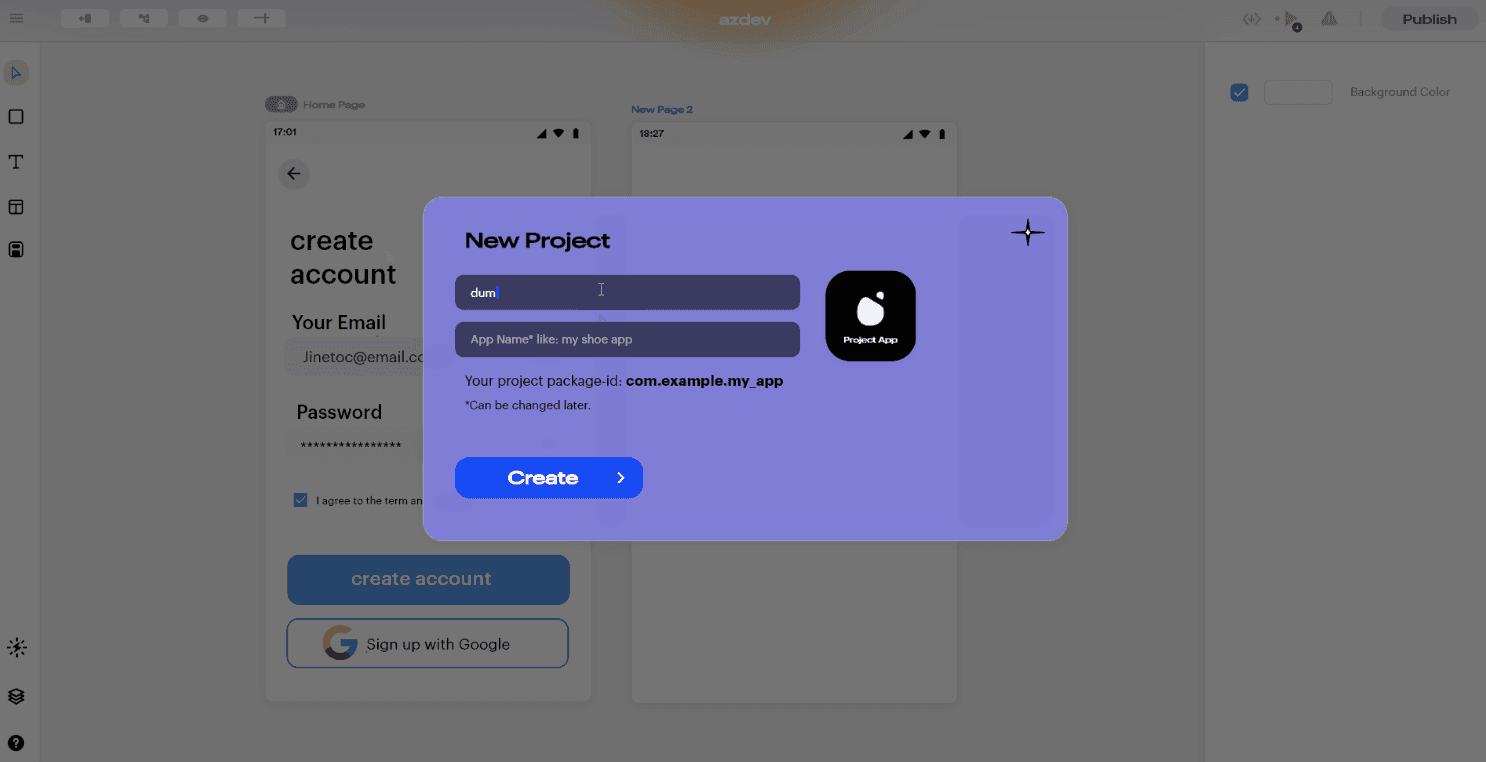
Starting from the very basics, the Status Panel lets you explore and work on features like,
Start a new Blup project;
Open an existing Blup project saved on the computer;
A help option that navigates you to Blup community and searches for instant solutions;
Adding a new page;
Adjusting guidelines;
Run the code;
Export the code and others.
Tools Panel
Let’s get to building the actual UI now. This panel contains tools like a rectangle cursor, text fields, layers, pages, community help, widgets, etc.
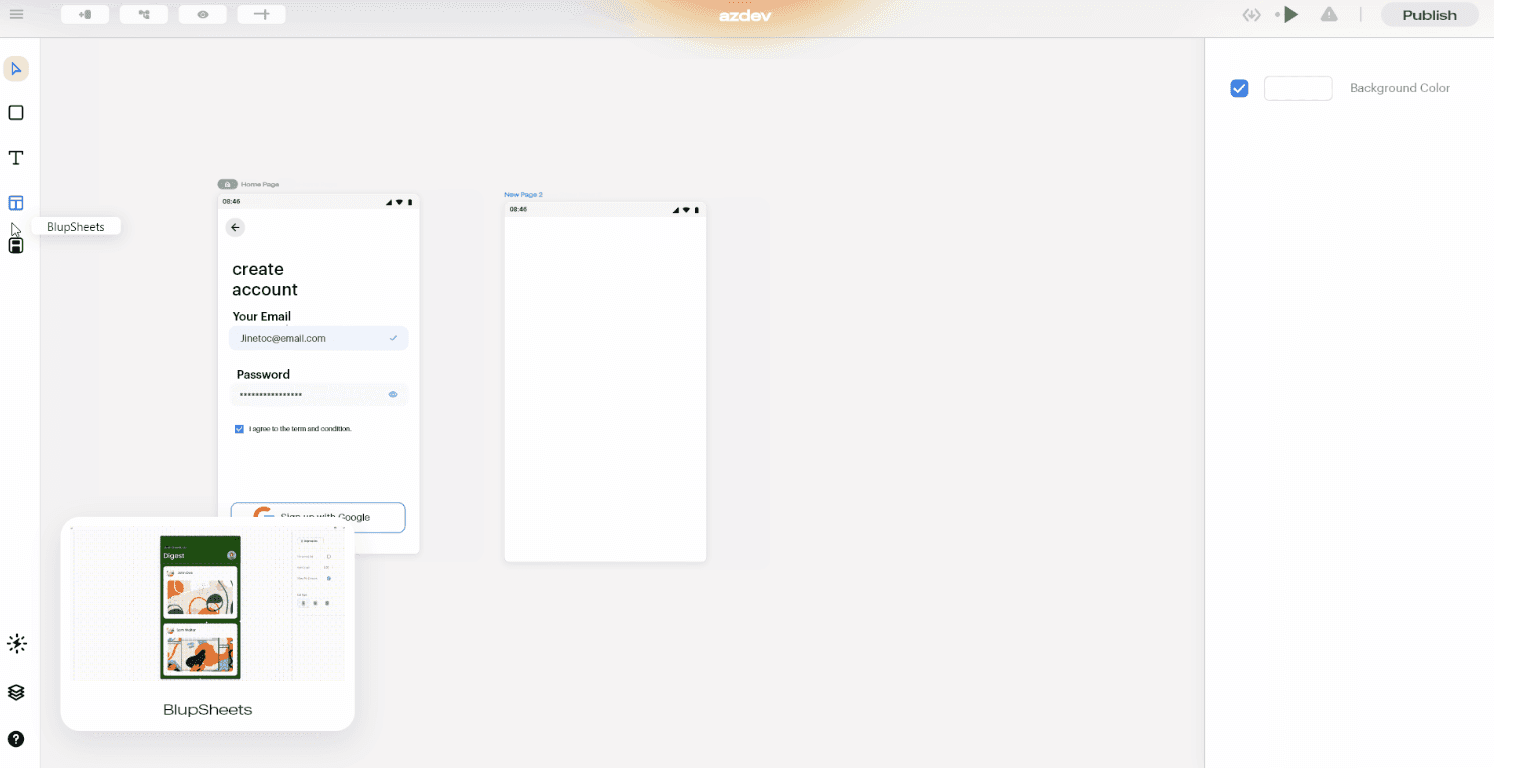
Widgets are an essential part of this section where you can use anyone’s pre-build widget or even put your self-built widget for the global community. These widgets adhere to the following guidelines:
Distinguishable CTAs
Design for context
Simple password recovery process
Textual Hierarchy and Other
Properties Panel
This panel helps you change the properties of the selected widget as per the custom screen you’re building. It provides options like
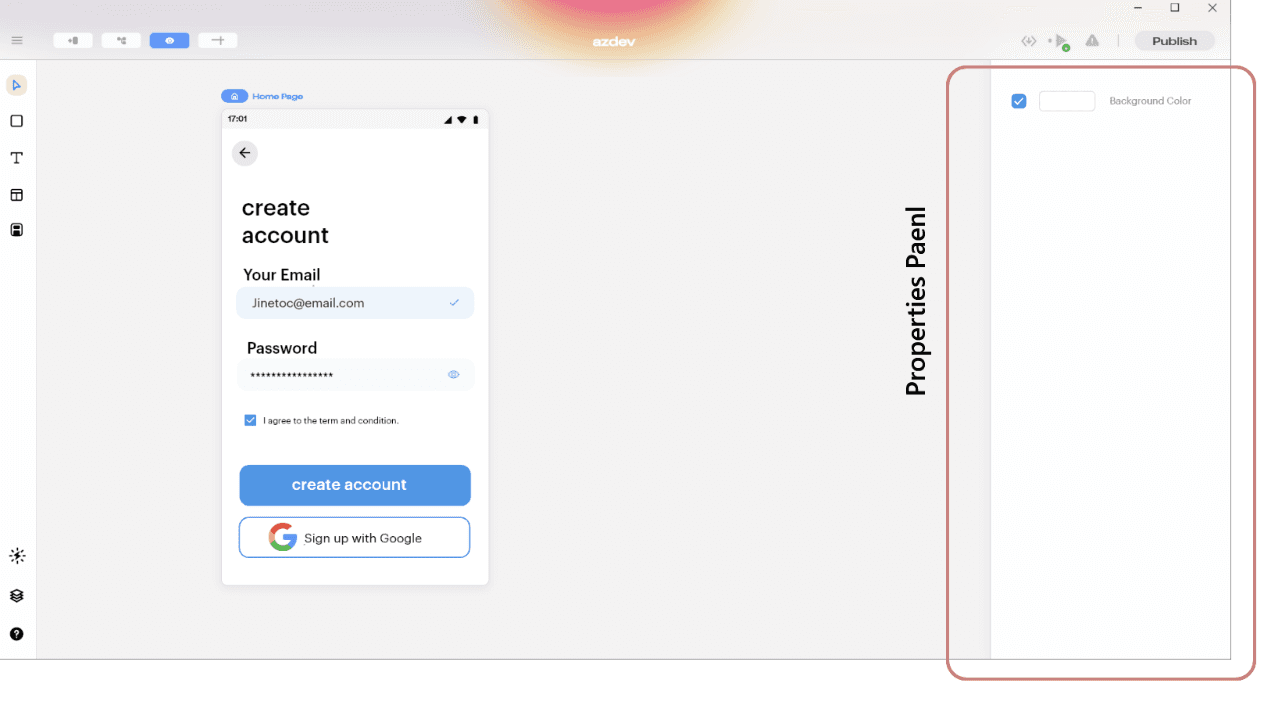
Canvas – Gradient/Color
Width and Height
Padding – Top/Right/Left/Bottom
Image fit Dropbox
Box corner radius
Font, and many more.
To learn about all the options, Blup provides to build the best UI, visit https://docs.blup.in/bluplightning/blupdesigner/properties-panel.
App Logics with #BlupLightning
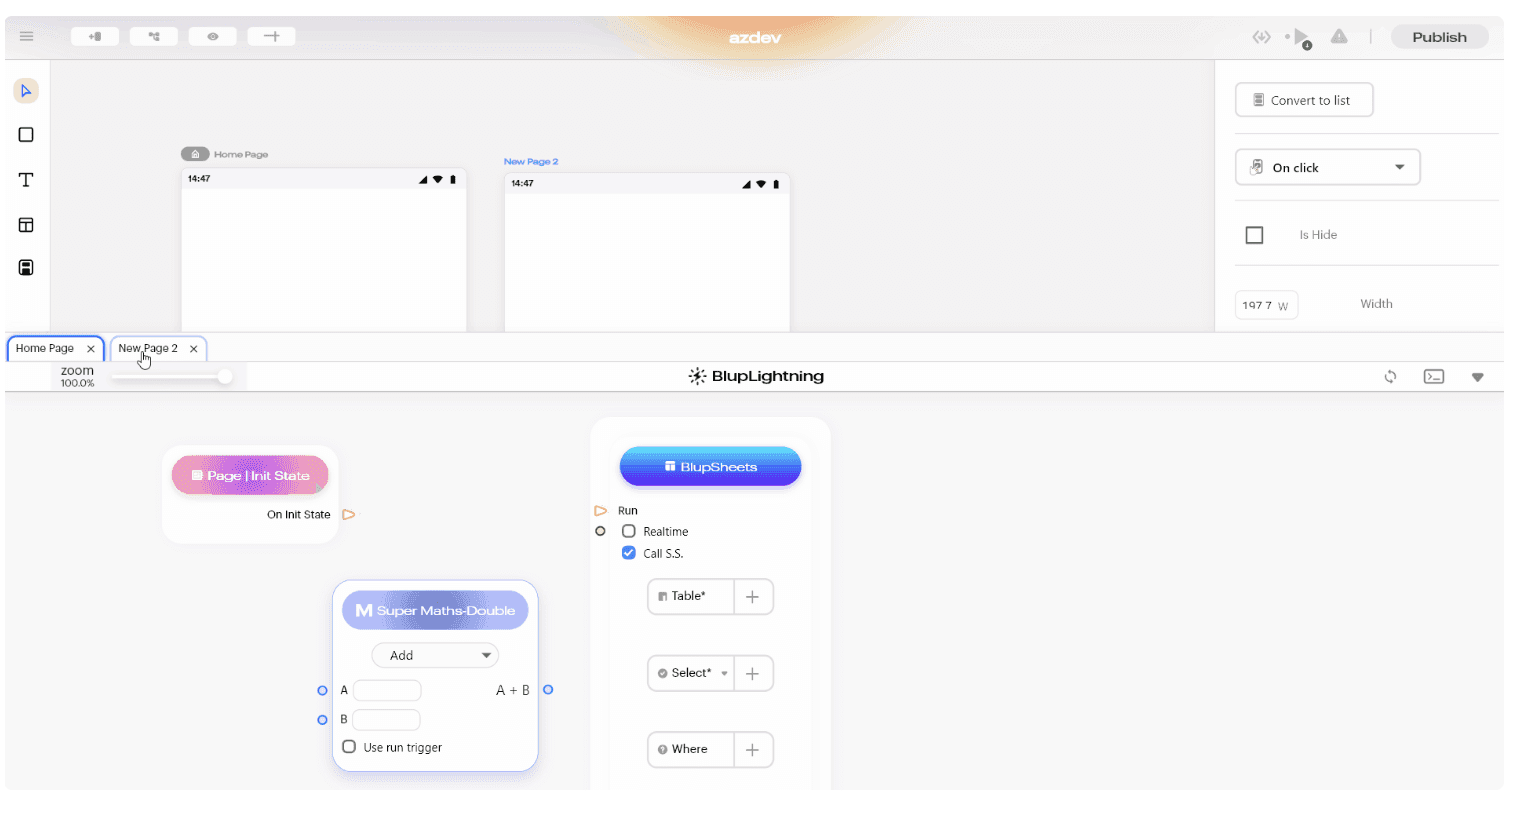
Now that you have created the best UI, let’s prepare your app by creating and running automated workflows with little to no code.
Using the visual designer and selecting from prebuilt operations, you can quickly build a workflow that integrates and manages your apps, data, services, and systems. These logics can then be used with any widget/component created on #BlupDesigner and made functional.
Managed Database with Blup Backend
Do you trust AWS? We certainly do, and we hope you do too!
This trust helped Blup create a robust GUI-based database that works seamlessly with Blup, called the Blup Backend.
Being on top of AWS, data privacy is never compromised, and helps you load/save data into Backend.
Backend database matches the style of a traditional relational database that helps Backend store data in rows and columns. Few of the actionable items, or let’s say the components of Backend are:
Status bar section – Collapse, table, refresh, switch, delete
Middle bar section
Bottom bar section
A little knowledge on how the Backend works?
In order to start working with Backend in your backend, first we need to structure the database, meaning we need to define the schema for the database. This generally works on two things:
Understanding how to create a table in Backend
Modifying a table in Backend
High-level knowledge and step-by-step procedure can be found in our documentation: https://docs.blup.in/bluplightning/blupsheets.
Publish
Finally, you’re on the verge of making your app live on the App store or Play store. Let’s get this step straightforward.
Publish Blup Apps on iOS
Hop on to Configuring the Details with a settings icon. To start with iOS Cloud Build, we would first have to configure the values.
Follow the steps below:
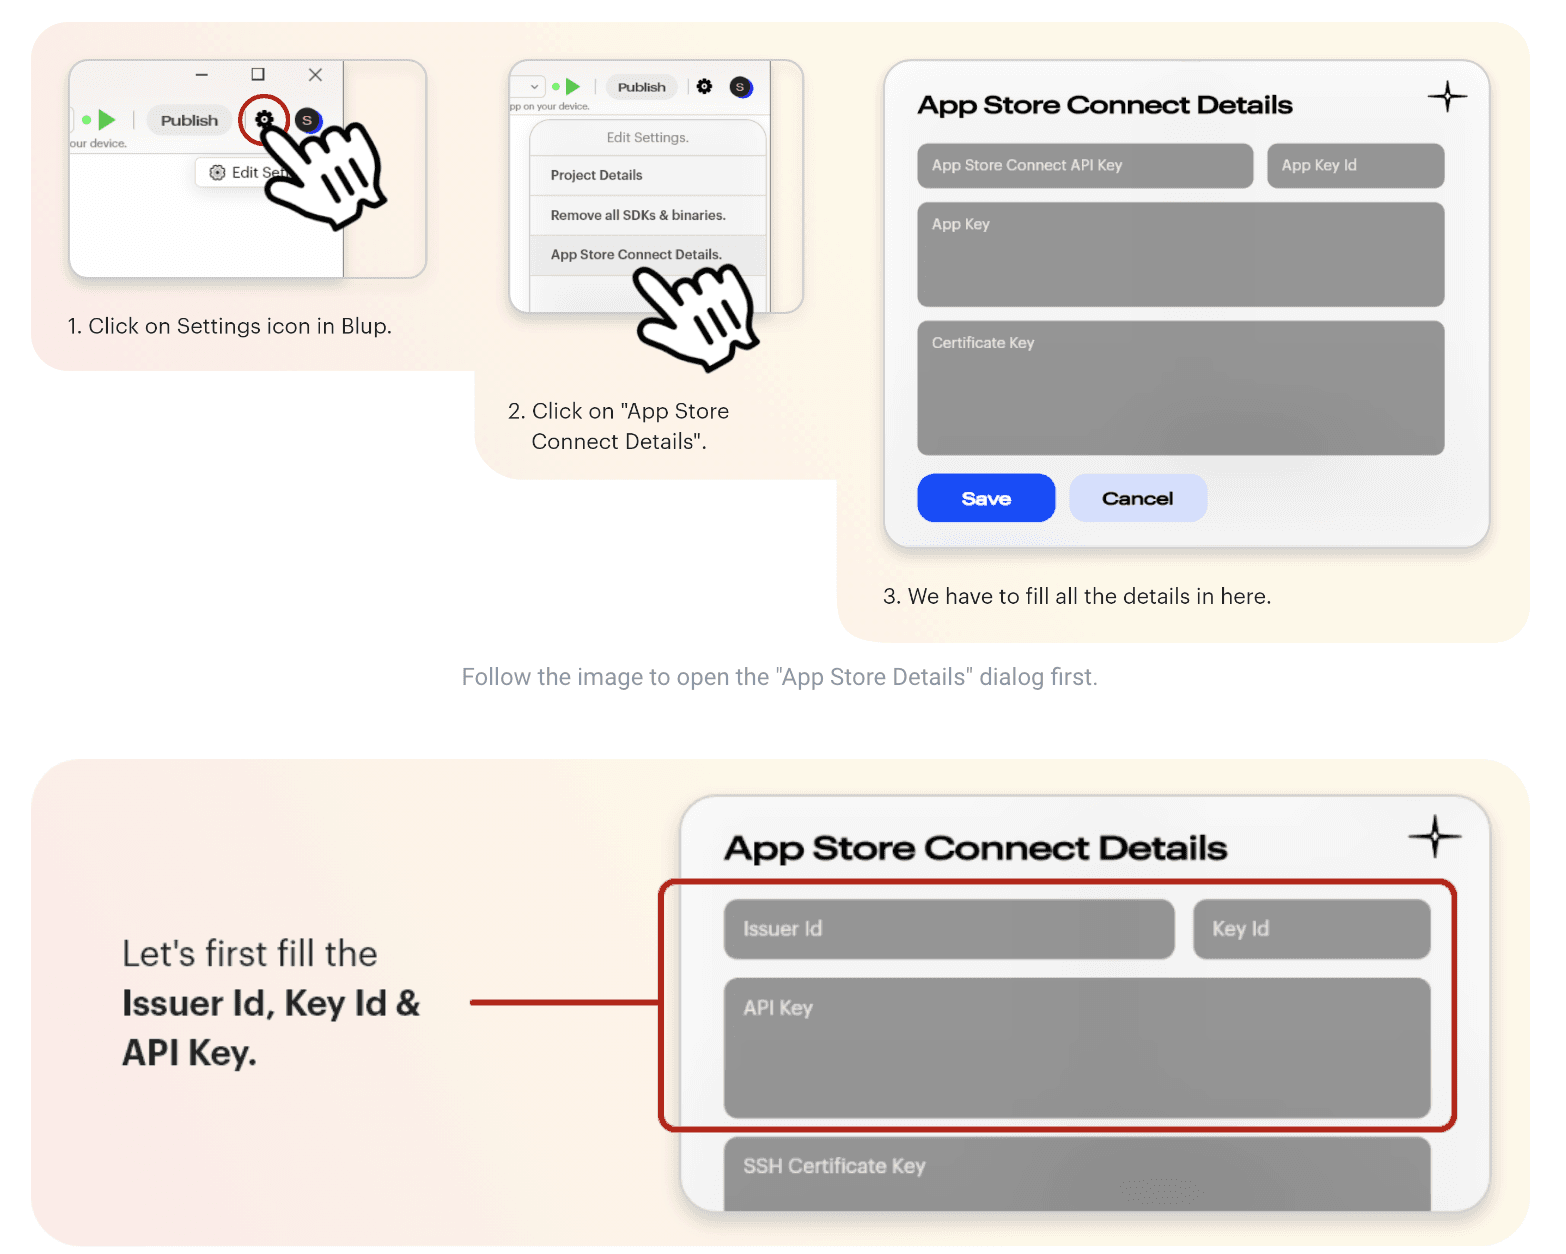
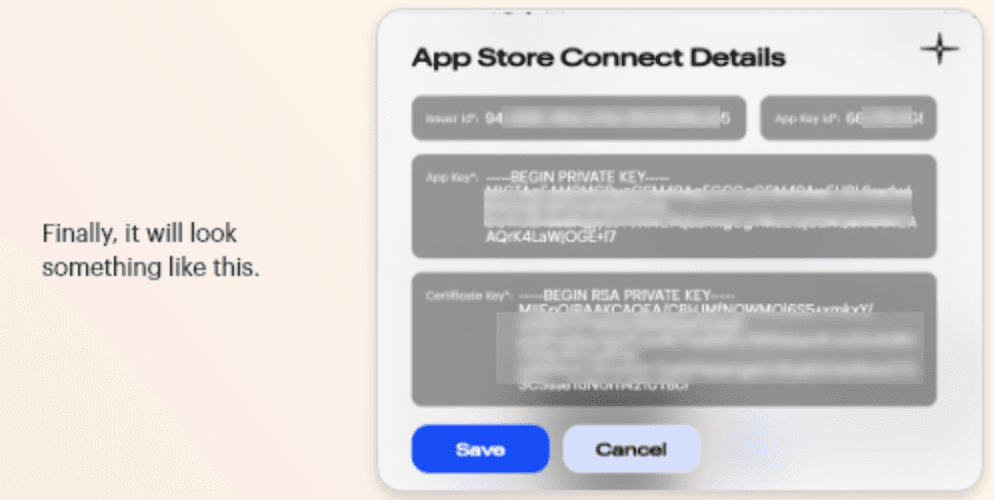
All applications have to be digitally signed before they are made available to the public to confirm their author and guarantee that the code has not been altered or corrupted since it was signed. For this, one needs to Fill out four major fields: Issuer Id, Key Id, API Key, and SSH Certificate Key. Let’s see the process in detail:
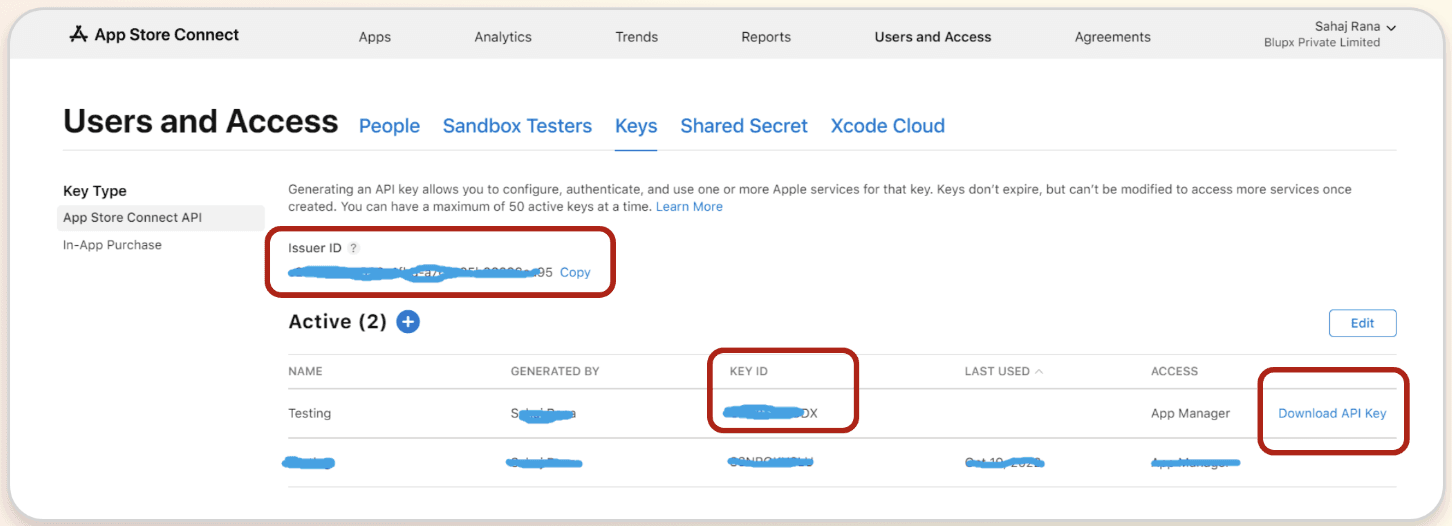
Fetching Issuer Id, Key Id, and API Key:
Creating a dedicated App Store Connect API key for Blup in App Store Connect is recommended. To do so:
Log in to App Store Connect and navigate to Users and Access > Keys.
Click on the + sign to generate a new API key.
Enter the name for the key and select an access level. We recommend choosing App Manager access rights, read more about Apple Developer Program role permissions here.
Click Generate.
As soon as the key is generated, you can see it added to the list of active keys. Click Download API Key to save the private key for later. Note that the key can only be downloaded once.
Fetching SSH Certificate Key:
To sign iOS apps, you can use the private key of an iOS Distribution certificate that has already been created in your Apple Developer Program account.
If you do not have a private key, then create a new one from the below method:
Create a new key
You can create a new 2048-bit RSA key by running the command below in your terminal:
For Mac:
ssh-keygen -t rsa -b 2048 -m PEM -f ~/Desktop/ios_distribution_private_key -q -N “”
For Windows:
Open CMD, & type ssh-keygen. If this command doesn’t work. Download OpenSSH from here.
ssh-keygen -t rsa -b 2048 -m PEM -f ./MyKeyGen/ios_distribution_private_key -q -N “”
This new private key will be used to create a new iOS Distribution certificate in your Apple Developer Program account if there isn’t one that already matches this private key.
Paste this private key in Blup “App Store Connect Dialog "
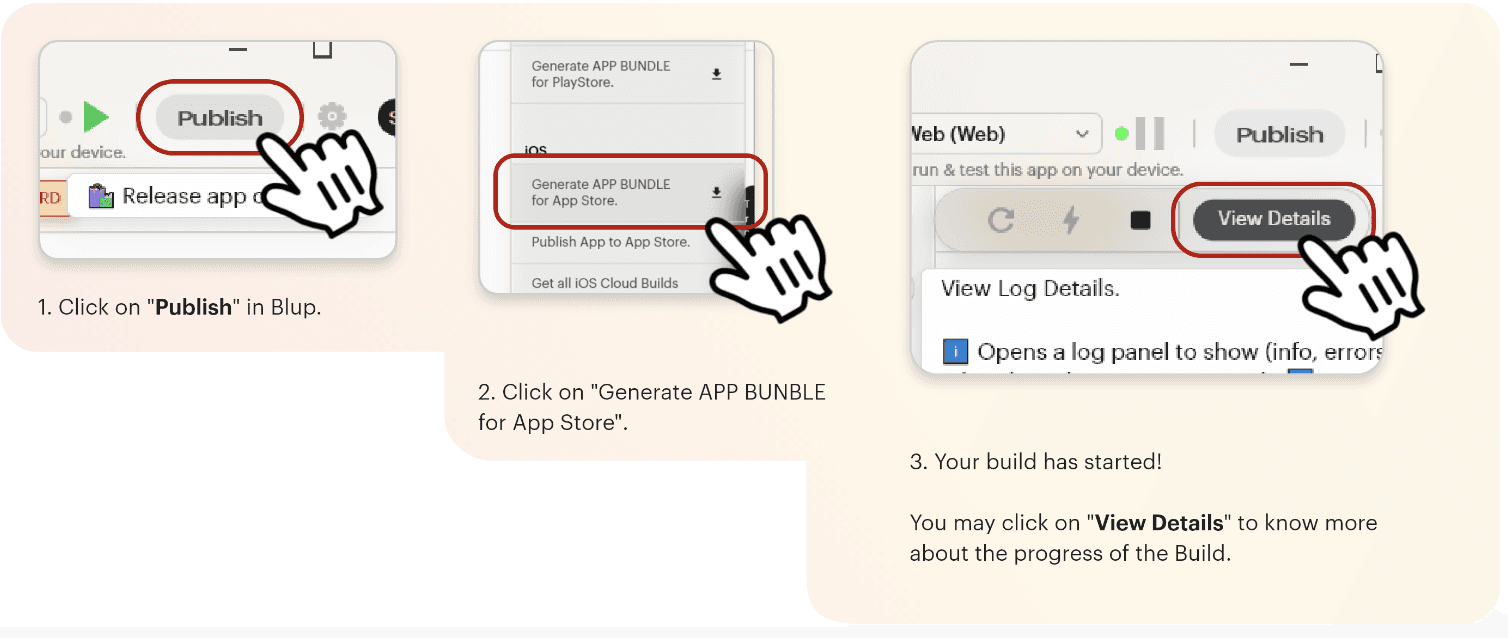
Now simply build & Publish an iOS build on App Store using the below step, and you’re done!
Publish Blup Apps on Android
Click here to get the step-by-step instructions to publish your app in the play store.
Why Flutter Developers love Blup
You’ve come this far; now tell us isn’t this the most simple way to push Flutter apps into the market? It’s literally just drag-and-drop, set logic, and go live.
As more developers and founders start embracing no and low-code platforms, there’s no reason why you; as an individual or an entity shouldn’t. It’s as simple as making yourself a cup of Cappuccino.
You can get started directly by downloading the Blup platform on your system at https://blup.in/downloads.
Still left with a few doubts, why not drop us a line at contact@blup.in?
Oh, by the way, we forgot to mention Blup is creating a community of people like you on Discord; hope to see you engaging there.
Until Next Time!
Greetings, my fellow Flutter Developers!
If you’re one of those who want to make your Flutter apps stand out among the vast ocean of competitors, Blup is the only thing you’ll need.
Want to create production-ready mobile apps with no & pro code, visual logic & immersive UI design all in one place?
🎊We present you Blup 🎊
Build Flutter apps with Blup
First things first! You must ensure that you have downloaded the Blup Setup on your Mac/Windows. If you haven't yet, go to blup.in/downloads now and it should auto-download the setup. Install the app as per the instructions on the screen. Voila! you're ready to get rolling!

To begin using Blup, you need to register using an email first. Enter your name and email on the registration screen and hit "Create Account". For security purposes, you will have to authenticate the account via an OTP, which you will get on the registered email.
Drumrolls, you’re now part of the Blup community .🥁

Before you begin using the Blup interface, you need to understand the core steps of building the Flutter apps. Blup involves 4 major steps from getting your app designed to publishing your app.
These steps are:
Design
Logics
Backend
Publish
Let’s look at them one by one.
Design beautiful apps with #BlupDesigner
Blup is a no-code and pro-code platform that enables you to create app designs that are just as spectacular as those created by designers from scratch, while taking up less time and effort.
Flutter App Design is all about working with crucial elements and ease of UI features. This is where Blup Offers rich featured BlupDesigner. You can work on many panels like,
Status panel: present on the top.
Tools panel: present on the left side
Properties panel: present on the right side.
Pages: present in the center.
All these panels contribute in making an immersive UI. Let’s learn about them a bit more.
Status Panel
Status Panel of Blup is where you get access to projects, new pages, guidelines and many more.

Starting from the very basics, the Status Panel lets you explore and work on features like,
Start a new Blup project;
Open an existing Blup project saved on the computer;
A help option that navigates you to Blup community and searches for instant solutions;
Adding a new page;
Adjusting guidelines;
Run the code;
Export the code and others.
Tools Panel
Let’s get to building the actual UI now. This panel contains tools like a rectangle cursor, text fields, layers, pages, community help, widgets, etc.

Widgets are an essential part of this section where you can use anyone’s pre-build widget or even put your self-built widget for the global community. These widgets adhere to the following guidelines:
Distinguishable CTAs
Design for context
Simple password recovery process
Textual Hierarchy and Other
Properties Panel
This panel helps you change the properties of the selected widget as per the custom screen you’re building. It provides options like

Canvas – Gradient/Color
Width and Height
Padding – Top/Right/Left/Bottom
Image fit Dropbox
Box corner radius
Font, and many more.
To learn about all the options, Blup provides to build the best UI, visit https://docs.blup.in/bluplightning/blupdesigner/properties-panel.
App Logics with #BlupLightning

Now that you have created the best UI, let’s prepare your app by creating and running automated workflows with little to no code.
Using the visual designer and selecting from prebuilt operations, you can quickly build a workflow that integrates and manages your apps, data, services, and systems. These logics can then be used with any widget/component created on #BlupDesigner and made functional.
Managed Database with Blup Backend
Do you trust AWS? We certainly do, and we hope you do too!
This trust helped Blup create a robust GUI-based database that works seamlessly with Blup, called the Blup Backend.
Being on top of AWS, data privacy is never compromised, and helps you load/save data into Backend.
Backend database matches the style of a traditional relational database that helps Backend store data in rows and columns. Few of the actionable items, or let’s say the components of Backend are:
Status bar section – Collapse, table, refresh, switch, delete
Middle bar section
Bottom bar section
A little knowledge on how the Backend works?
In order to start working with Backend in your backend, first we need to structure the database, meaning we need to define the schema for the database. This generally works on two things:
Understanding how to create a table in Backend
Modifying a table in Backend
High-level knowledge and step-by-step procedure can be found in our documentation: https://docs.blup.in/bluplightning/blupsheets.
Publish
Finally, you’re on the verge of making your app live on the App store or Play store. Let’s get this step straightforward.
Publish Blup Apps on iOS
Hop on to Configuring the Details with a settings icon. To start with iOS Cloud Build, we would first have to configure the values.
Follow the steps below:

All applications have to be digitally signed before they are made available to the public to confirm their author and guarantee that the code has not been altered or corrupted since it was signed. For this, one needs to Fill out four major fields: Issuer Id, Key Id, API Key, and SSH Certificate Key. Let’s see the process in detail:
Fetching Issuer Id, Key Id, and API Key:
Creating a dedicated App Store Connect API key for Blup in App Store Connect is recommended. To do so:
Log in to App Store Connect and navigate to Users and Access > Keys.
Click on the + sign to generate a new API key.
Enter the name for the key and select an access level. We recommend choosing App Manager access rights, read more about Apple Developer Program role permissions here.
Click Generate.
As soon as the key is generated, you can see it added to the list of active keys. Click Download API Key to save the private key for later. Note that the key can only be downloaded once.

Fetching SSH Certificate Key:
To sign iOS apps, you can use the private key of an iOS Distribution certificate that has already been created in your Apple Developer Program account.
If you do not have a private key, then create a new one from the below method:
Create a new key
You can create a new 2048-bit RSA key by running the command below in your terminal:
For Mac:
ssh-keygen -t rsa -b 2048 -m PEM -f ~/Desktop/ios_distribution_private_key -q -N “”
For Windows:
Open CMD, & type ssh-keygen. If this command doesn’t work. Download OpenSSH from here.
ssh-keygen -t rsa -b 2048 -m PEM -f ./MyKeyGen/ios_distribution_private_key -q -N “”
This new private key will be used to create a new iOS Distribution certificate in your Apple Developer Program account if there isn’t one that already matches this private key.
Paste this private key in Blup “App Store Connect Dialog "

Now simply build & Publish an iOS build on App Store using the below step, and you’re done!

Publish Blup Apps on Android
Click here to get the step-by-step instructions to publish your app in the play store.
Why Flutter Developers love Blup
You’ve come this far; now tell us isn’t this the most simple way to push Flutter apps into the market? It’s literally just drag-and-drop, set logic, and go live.
As more developers and founders start embracing no and low-code platforms, there’s no reason why you; as an individual or an entity shouldn’t. It’s as simple as making yourself a cup of Cappuccino.
You can get started directly by downloading the Blup platform on your system at https://blup.in/downloads.
Still left with a few doubts, why not drop us a line at contact@blup.in?
Oh, by the way, we forgot to mention Blup is creating a community of people like you on Discord; hope to see you engaging there.
Until Next Time!
Greetings, my fellow Flutter Developers!
If you’re one of those who want to make your Flutter apps stand out among the vast ocean of competitors, Blup is the only thing you’ll need.
Want to create production-ready mobile apps with no & pro code, visual logic & immersive UI design all in one place?
🎊We present you Blup 🎊
Build Flutter apps with Blup
First things first! You must ensure that you have downloaded the Blup Setup on your Mac/Windows. If you haven't yet, go to blup.in/downloads now and it should auto-download the setup. Install the app as per the instructions on the screen. Voila! you're ready to get rolling!

To begin using Blup, you need to register using an email first. Enter your name and email on the registration screen and hit "Create Account". For security purposes, you will have to authenticate the account via an OTP, which you will get on the registered email.
Drumrolls, you’re now part of the Blup community .🥁

Before you begin using the Blup interface, you need to understand the core steps of building the Flutter apps. Blup involves 4 major steps from getting your app designed to publishing your app.
These steps are:
Design
Logics
Backend
Publish
Let’s look at them one by one.
Design beautiful apps with #BlupDesigner
Blup is a no-code and pro-code platform that enables you to create app designs that are just as spectacular as those created by designers from scratch, while taking up less time and effort.
Flutter App Design is all about working with crucial elements and ease of UI features. This is where Blup Offers rich featured BlupDesigner. You can work on many panels like,
Status panel: present on the top.
Tools panel: present on the left side
Properties panel: present on the right side.
Pages: present in the center.
All these panels contribute in making an immersive UI. Let’s learn about them a bit more.
Status Panel
Status Panel of Blup is where you get access to projects, new pages, guidelines and many more.

Starting from the very basics, the Status Panel lets you explore and work on features like,
Start a new Blup project;
Open an existing Blup project saved on the computer;
A help option that navigates you to Blup community and searches for instant solutions;
Adding a new page;
Adjusting guidelines;
Run the code;
Export the code and others.
Tools Panel
Let’s get to building the actual UI now. This panel contains tools like a rectangle cursor, text fields, layers, pages, community help, widgets, etc.

Widgets are an essential part of this section where you can use anyone’s pre-build widget or even put your self-built widget for the global community. These widgets adhere to the following guidelines:
Distinguishable CTAs
Design for context
Simple password recovery process
Textual Hierarchy and Other
Properties Panel
This panel helps you change the properties of the selected widget as per the custom screen you’re building. It provides options like

Canvas – Gradient/Color
Width and Height
Padding – Top/Right/Left/Bottom
Image fit Dropbox
Box corner radius
Font, and many more.
To learn about all the options, Blup provides to build the best UI, visit https://docs.blup.in/bluplightning/blupdesigner/properties-panel.
App Logics with #BlupLightning

Now that you have created the best UI, let’s prepare your app by creating and running automated workflows with little to no code.
Using the visual designer and selecting from prebuilt operations, you can quickly build a workflow that integrates and manages your apps, data, services, and systems. These logics can then be used with any widget/component created on #BlupDesigner and made functional.
Managed Database with Blup Backend
Do you trust AWS? We certainly do, and we hope you do too!
This trust helped Blup create a robust GUI-based database that works seamlessly with Blup, called the Blup Backend.
Being on top of AWS, data privacy is never compromised, and helps you load/save data into Backend.
Backend database matches the style of a traditional relational database that helps Backend store data in rows and columns. Few of the actionable items, or let’s say the components of Backend are:
Status bar section – Collapse, table, refresh, switch, delete
Middle bar section
Bottom bar section
A little knowledge on how the Backend works?
In order to start working with Backend in your backend, first we need to structure the database, meaning we need to define the schema for the database. This generally works on two things:
Understanding how to create a table in Backend
Modifying a table in Backend
High-level knowledge and step-by-step procedure can be found in our documentation: https://docs.blup.in/bluplightning/blupsheets.
Publish
Finally, you’re on the verge of making your app live on the App store or Play store. Let’s get this step straightforward.
Publish Blup Apps on iOS
Hop on to Configuring the Details with a settings icon. To start with iOS Cloud Build, we would first have to configure the values.
Follow the steps below:

All applications have to be digitally signed before they are made available to the public to confirm their author and guarantee that the code has not been altered or corrupted since it was signed. For this, one needs to Fill out four major fields: Issuer Id, Key Id, API Key, and SSH Certificate Key. Let’s see the process in detail:
Fetching Issuer Id, Key Id, and API Key:
Creating a dedicated App Store Connect API key for Blup in App Store Connect is recommended. To do so:
Log in to App Store Connect and navigate to Users and Access > Keys.
Click on the + sign to generate a new API key.
Enter the name for the key and select an access level. We recommend choosing App Manager access rights, read more about Apple Developer Program role permissions here.
Click Generate.
As soon as the key is generated, you can see it added to the list of active keys. Click Download API Key to save the private key for later. Note that the key can only be downloaded once.

Fetching SSH Certificate Key:
To sign iOS apps, you can use the private key of an iOS Distribution certificate that has already been created in your Apple Developer Program account.
If you do not have a private key, then create a new one from the below method:
Create a new key
You can create a new 2048-bit RSA key by running the command below in your terminal:
For Mac:
ssh-keygen -t rsa -b 2048 -m PEM -f ~/Desktop/ios_distribution_private_key -q -N “”
For Windows:
Open CMD, & type ssh-keygen. If this command doesn’t work. Download OpenSSH from here.
ssh-keygen -t rsa -b 2048 -m PEM -f ./MyKeyGen/ios_distribution_private_key -q -N “”
This new private key will be used to create a new iOS Distribution certificate in your Apple Developer Program account if there isn’t one that already matches this private key.
Paste this private key in Blup “App Store Connect Dialog "

Now simply build & Publish an iOS build on App Store using the below step, and you’re done!

Publish Blup Apps on Android
Click here to get the step-by-step instructions to publish your app in the play store.
Why Flutter Developers love Blup
You’ve come this far; now tell us isn’t this the most simple way to push Flutter apps into the market? It’s literally just drag-and-drop, set logic, and go live.
As more developers and founders start embracing no and low-code platforms, there’s no reason why you; as an individual or an entity shouldn’t. It’s as simple as making yourself a cup of Cappuccino.
You can get started directly by downloading the Blup platform on your system at https://blup.in/downloads.
Still left with a few doubts, why not drop us a line at contact@blup.in?
Oh, by the way, we forgot to mention Blup is creating a community of people like you on Discord; hope to see you engaging there.
Until Next Time!
Greetings, my fellow Flutter Developers!
If you’re one of those who want to make your Flutter apps stand out among the vast ocean of competitors, Blup is the only thing you’ll need.
Want to create production-ready mobile apps with no & pro code, visual logic & immersive UI design all in one place?
🎊We present you Blup 🎊
Build Flutter apps with Blup
First things first! You must ensure that you have downloaded the Blup Setup on your Mac/Windows. If you haven't yet, go to blup.in/downloads now and it should auto-download the setup. Install the app as per the instructions on the screen. Voila! you're ready to get rolling!

To begin using Blup, you need to register using an email first. Enter your name and email on the registration screen and hit "Create Account". For security purposes, you will have to authenticate the account via an OTP, which you will get on the registered email.
Drumrolls, you’re now part of the Blup community .🥁

Before you begin using the Blup interface, you need to understand the core steps of building the Flutter apps. Blup involves 4 major steps from getting your app designed to publishing your app.
These steps are:
Design
Logics
Backend
Publish
Let’s look at them one by one.
Design beautiful apps with #BlupDesigner
Blup is a no-code and pro-code platform that enables you to create app designs that are just as spectacular as those created by designers from scratch, while taking up less time and effort.
Flutter App Design is all about working with crucial elements and ease of UI features. This is where Blup Offers rich featured BlupDesigner. You can work on many panels like,
Status panel: present on the top.
Tools panel: present on the left side
Properties panel: present on the right side.
Pages: present in the center.
All these panels contribute in making an immersive UI. Let’s learn about them a bit more.
Status Panel
Status Panel of Blup is where you get access to projects, new pages, guidelines and many more.

Starting from the very basics, the Status Panel lets you explore and work on features like,
Start a new Blup project;
Open an existing Blup project saved on the computer;
A help option that navigates you to Blup community and searches for instant solutions;
Adding a new page;
Adjusting guidelines;
Run the code;
Export the code and others.
Tools Panel
Let’s get to building the actual UI now. This panel contains tools like a rectangle cursor, text fields, layers, pages, community help, widgets, etc.

Widgets are an essential part of this section where you can use anyone’s pre-build widget or even put your self-built widget for the global community. These widgets adhere to the following guidelines:
Distinguishable CTAs
Design for context
Simple password recovery process
Textual Hierarchy and Other
Properties Panel
This panel helps you change the properties of the selected widget as per the custom screen you’re building. It provides options like

Canvas – Gradient/Color
Width and Height
Padding – Top/Right/Left/Bottom
Image fit Dropbox
Box corner radius
Font, and many more.
To learn about all the options, Blup provides to build the best UI, visit https://docs.blup.in/bluplightning/blupdesigner/properties-panel.
App Logics with #BlupLightning

Now that you have created the best UI, let’s prepare your app by creating and running automated workflows with little to no code.
Using the visual designer and selecting from prebuilt operations, you can quickly build a workflow that integrates and manages your apps, data, services, and systems. These logics can then be used with any widget/component created on #BlupDesigner and made functional.
Managed Database with Blup Backend
Do you trust AWS? We certainly do, and we hope you do too!
This trust helped Blup create a robust GUI-based database that works seamlessly with Blup, called the Blup Backend.
Being on top of AWS, data privacy is never compromised, and helps you load/save data into Backend.
Backend database matches the style of a traditional relational database that helps Backend store data in rows and columns. Few of the actionable items, or let’s say the components of Backend are:
Status bar section – Collapse, table, refresh, switch, delete
Middle bar section
Bottom bar section
A little knowledge on how the Backend works?
In order to start working with Backend in your backend, first we need to structure the database, meaning we need to define the schema for the database. This generally works on two things:
Understanding how to create a table in Backend
Modifying a table in Backend
High-level knowledge and step-by-step procedure can be found in our documentation: https://docs.blup.in/bluplightning/blupsheets.
Publish
Finally, you’re on the verge of making your app live on the App store or Play store. Let’s get this step straightforward.
Publish Blup Apps on iOS
Hop on to Configuring the Details with a settings icon. To start with iOS Cloud Build, we would first have to configure the values.
Follow the steps below:

All applications have to be digitally signed before they are made available to the public to confirm their author and guarantee that the code has not been altered or corrupted since it was signed. For this, one needs to Fill out four major fields: Issuer Id, Key Id, API Key, and SSH Certificate Key. Let’s see the process in detail:
Fetching Issuer Id, Key Id, and API Key:
Creating a dedicated App Store Connect API key for Blup in App Store Connect is recommended. To do so:
Log in to App Store Connect and navigate to Users and Access > Keys.
Click on the + sign to generate a new API key.
Enter the name for the key and select an access level. We recommend choosing App Manager access rights, read more about Apple Developer Program role permissions here.
Click Generate.
As soon as the key is generated, you can see it added to the list of active keys. Click Download API Key to save the private key for later. Note that the key can only be downloaded once.

Fetching SSH Certificate Key:
To sign iOS apps, you can use the private key of an iOS Distribution certificate that has already been created in your Apple Developer Program account.
If you do not have a private key, then create a new one from the below method:
Create a new key
You can create a new 2048-bit RSA key by running the command below in your terminal:
For Mac:
ssh-keygen -t rsa -b 2048 -m PEM -f ~/Desktop/ios_distribution_private_key -q -N “”
For Windows:
Open CMD, & type ssh-keygen. If this command doesn’t work. Download OpenSSH from here.
ssh-keygen -t rsa -b 2048 -m PEM -f ./MyKeyGen/ios_distribution_private_key -q -N “”
This new private key will be used to create a new iOS Distribution certificate in your Apple Developer Program account if there isn’t one that already matches this private key.
Paste this private key in Blup “App Store Connect Dialog "

Now simply build & Publish an iOS build on App Store using the below step, and you’re done!

Publish Blup Apps on Android
Click here to get the step-by-step instructions to publish your app in the play store.
Why Flutter Developers love Blup
You’ve come this far; now tell us isn’t this the most simple way to push Flutter apps into the market? It’s literally just drag-and-drop, set logic, and go live.
As more developers and founders start embracing no and low-code platforms, there’s no reason why you; as an individual or an entity shouldn’t. It’s as simple as making yourself a cup of Cappuccino.
You can get started directly by downloading the Blup platform on your system at https://blup.in/downloads.
Still left with a few doubts, why not drop us a line at contact@blup.in?
Oh, by the way, we forgot to mention Blup is creating a community of people like you on Discord; hope to see you engaging there.
Until Next Time!
© 2021-26 Blupx Private Limited.
All rights reserved.
© 2021-26 Blupx Private Limited.
All rights reserved.
© 2021-26 Blupx Private Limited.
All rights reserved.


