

Blup Logic Nodes: Connect APIs, UI & Debug Flows Easily

Introduction
Introduction
Introduction
Introduction
Blup's logic section is a game-changer in the realm of app development, offering a powerful and flexible system to connect UI elements, integrate third-party APIs, debug logic flows, and reuse components across different projects. Whether you're a beginner or an experienced developer, Blup's logic nodes provide the tools needed to create complex, efficient, and high-performing applications.
Why is the logic section so significant in Blup?
Versatility: Blup's logic nodes cater to various functions, from simple UI manipulations to complex data processing and API integrations.
User-Friendly: Designed with both novices and experts in mind, Blup’s interface makes it easy to visualize and manage logic flows.
Performance: Blup ensures that logic flows run smoothly and efficiently, regardless of the complexity or platform.
Common Questions from Blup Users:
What types of logic nodes are available in Blup?
How do I connect UI elements to logic nodes?
Can I integrate third-party APIs in the Logics section?
How do I debug logic flows in Blup?
Is it possible to reuse logic flows across different projects?
In this blog, we'll delve into the specifics of each of these aspects, providing a comprehensive guide to mastering Blup's logic nodes for superior app development. Whether you're looking to streamline your development process, enhance your app's functionality, or ensure top-notch performance, Blup's logic section has got you covered. Let's get started!
Blup Logic ⚡
Blup Logic ⚡
Blup Logic ⚡
Blup Logic ⚡
Logics ⚡: Create Logics Visually
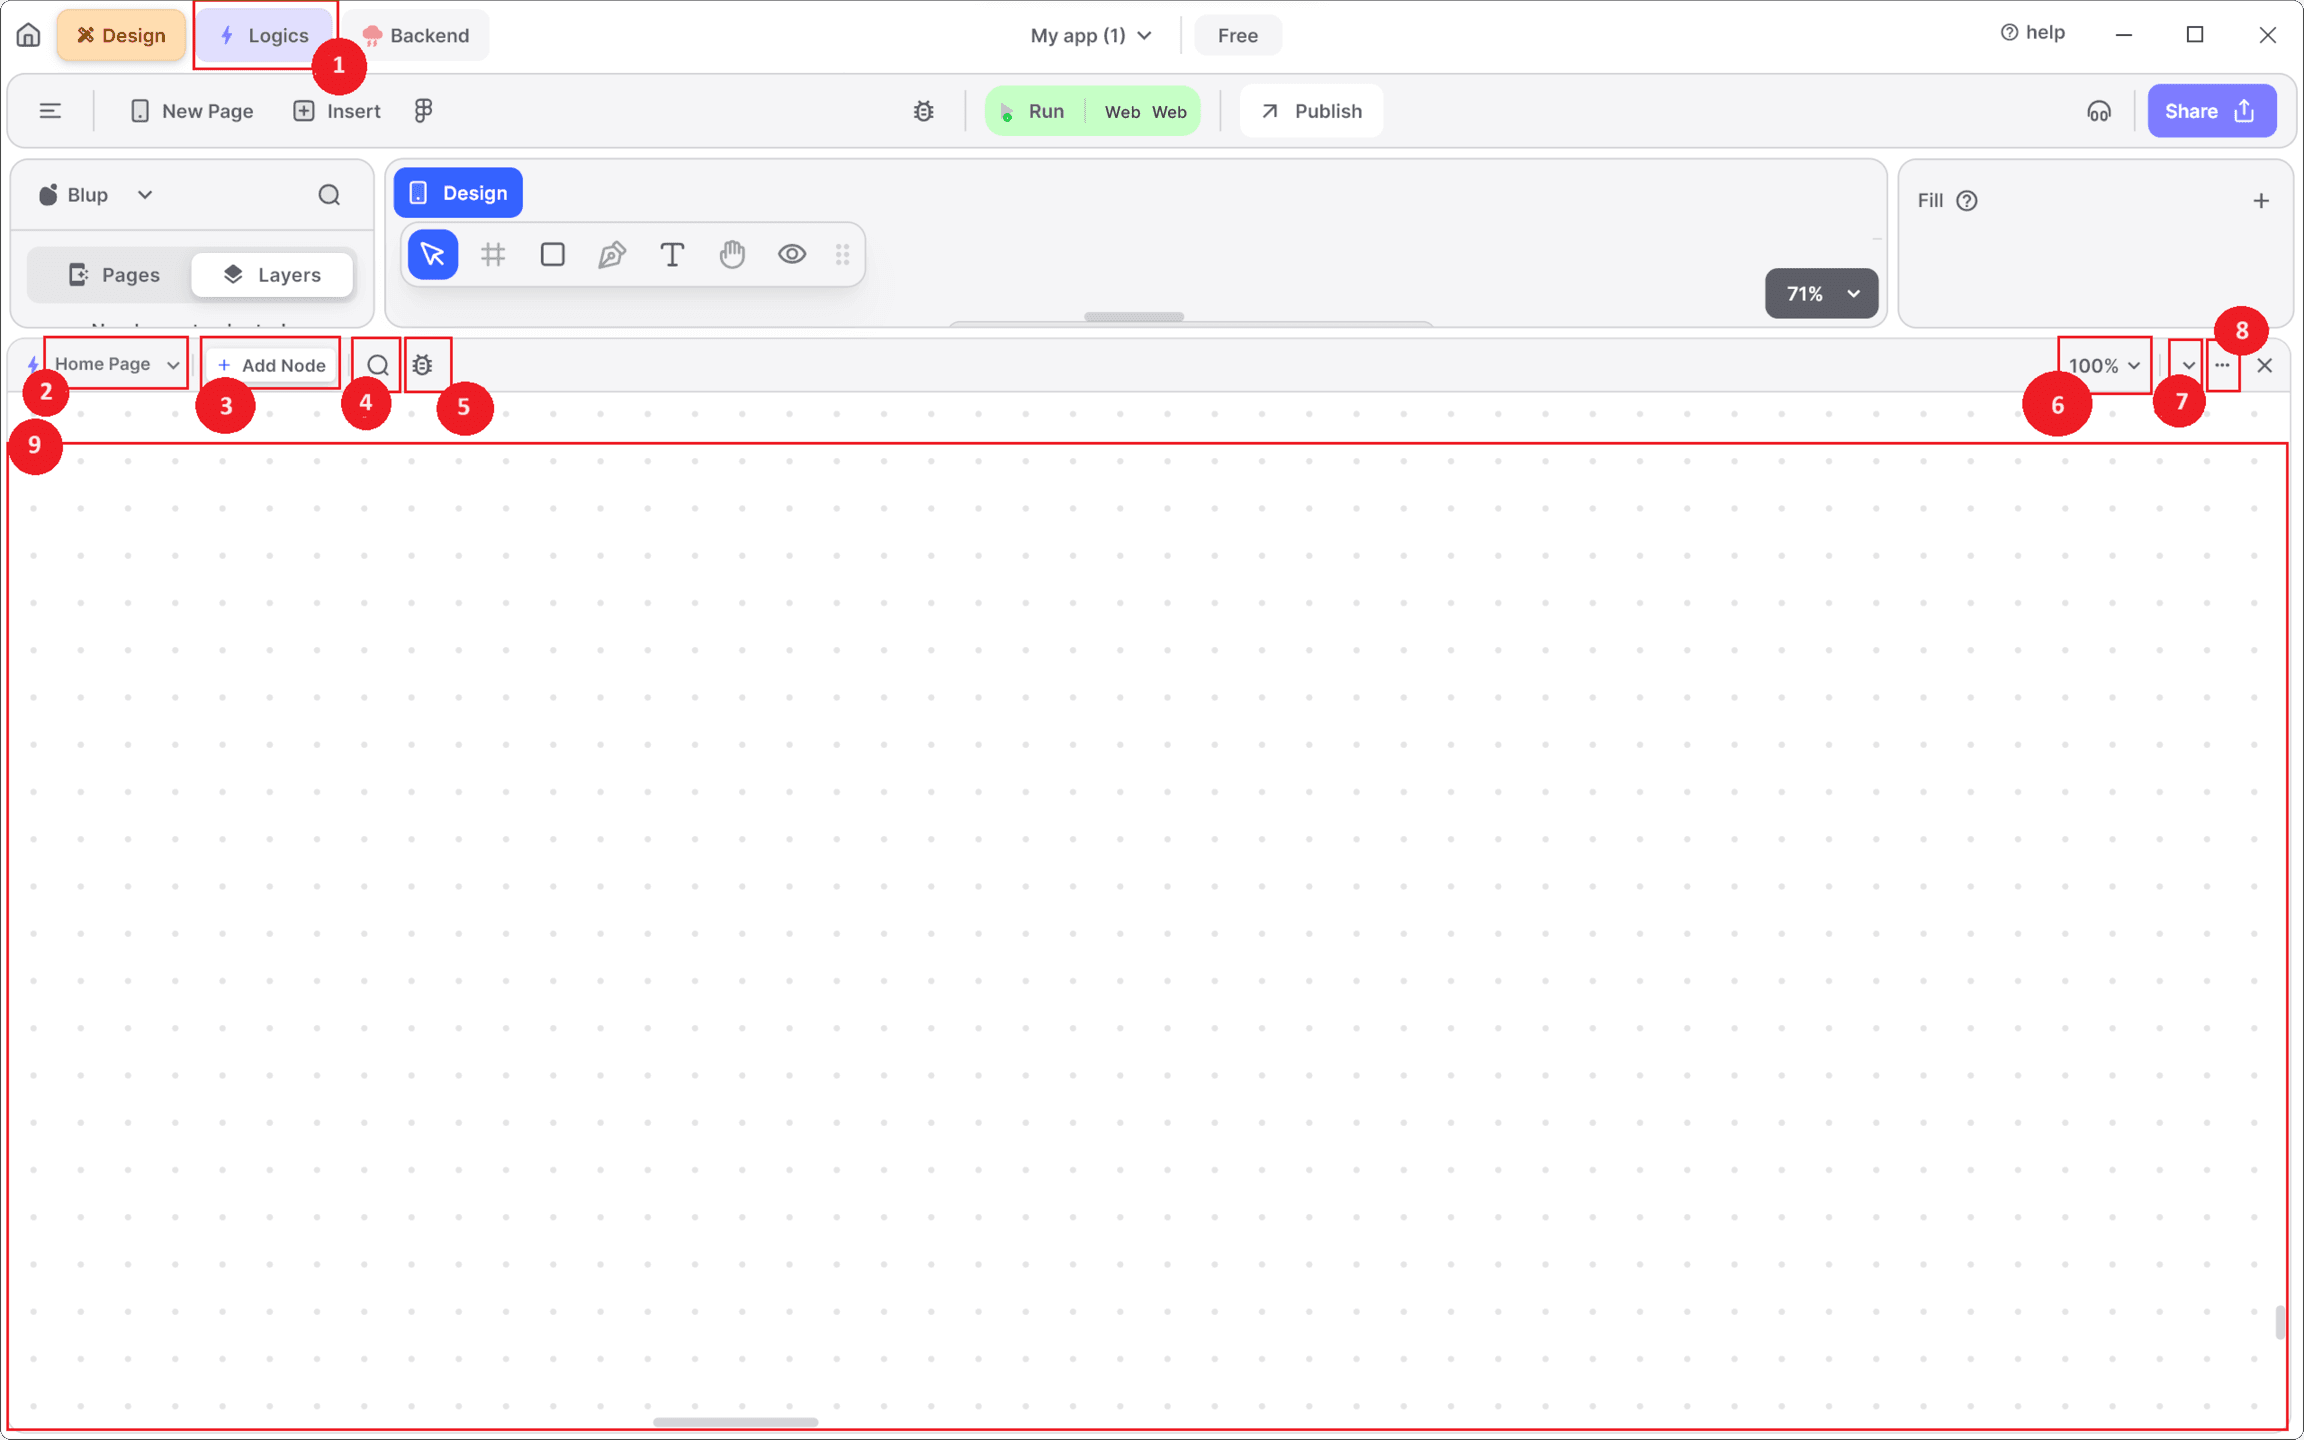
In Blup, the Logics module allows you to create and manage the logic for different widgets within your app. To access Logics in Blup, click on the Logics icon located on the top-left side, next to the Design panel, labeled Logics.
Dashboard
Logic Button
Clicking on the Logic button opens a Logic Console at the bottom for implementing your logics.
Logic Tab
Each tab corresponds to an individual page, encompassing all the logic associated with that specific page. These pages correspond to every app page in an application.
Add Node
The Add Node function allows you to choose which node to apply to your widget, whether you want to add functions, perform mathematical expressions, or other operations. You can also access the Add Node option by right-clicking on the logic console.
Search
The Search feature helps you find nodes added to the Logics App Page. Clicking on a node in the search results will zoom the Logics App Page to that node.
Debug Console
The Debug Console logs all app details during runtime to check for proper functionality, showing errors and print node outputs placed in your logic.
Logics Zoomer
This tool allows you to zoom in and out of the Logic app page for a better view of your logic nodes.
Logics Maximizer
It maximizes the Logic screen space within Blup, giving you more room to work on your logic.
Logics Menu
The Logics Menu includes options such as Refresh Logic, Help in Logic, Hide/Show Minimap, and Hide/Show Debug Console:
Refresh Logic: Refreshes all logic nodes.
Help in Logics: Opens a help box with information on how to use logic and node colors.
Hide/Show Minimap: Toggles a mini-map of the Logic console.
Hide/Show Debug Console: Toggles the debug console.
Logics App Page
This is where all logics are created by connecting or adding nodes, serving as the backbone of Blup for logic creation.
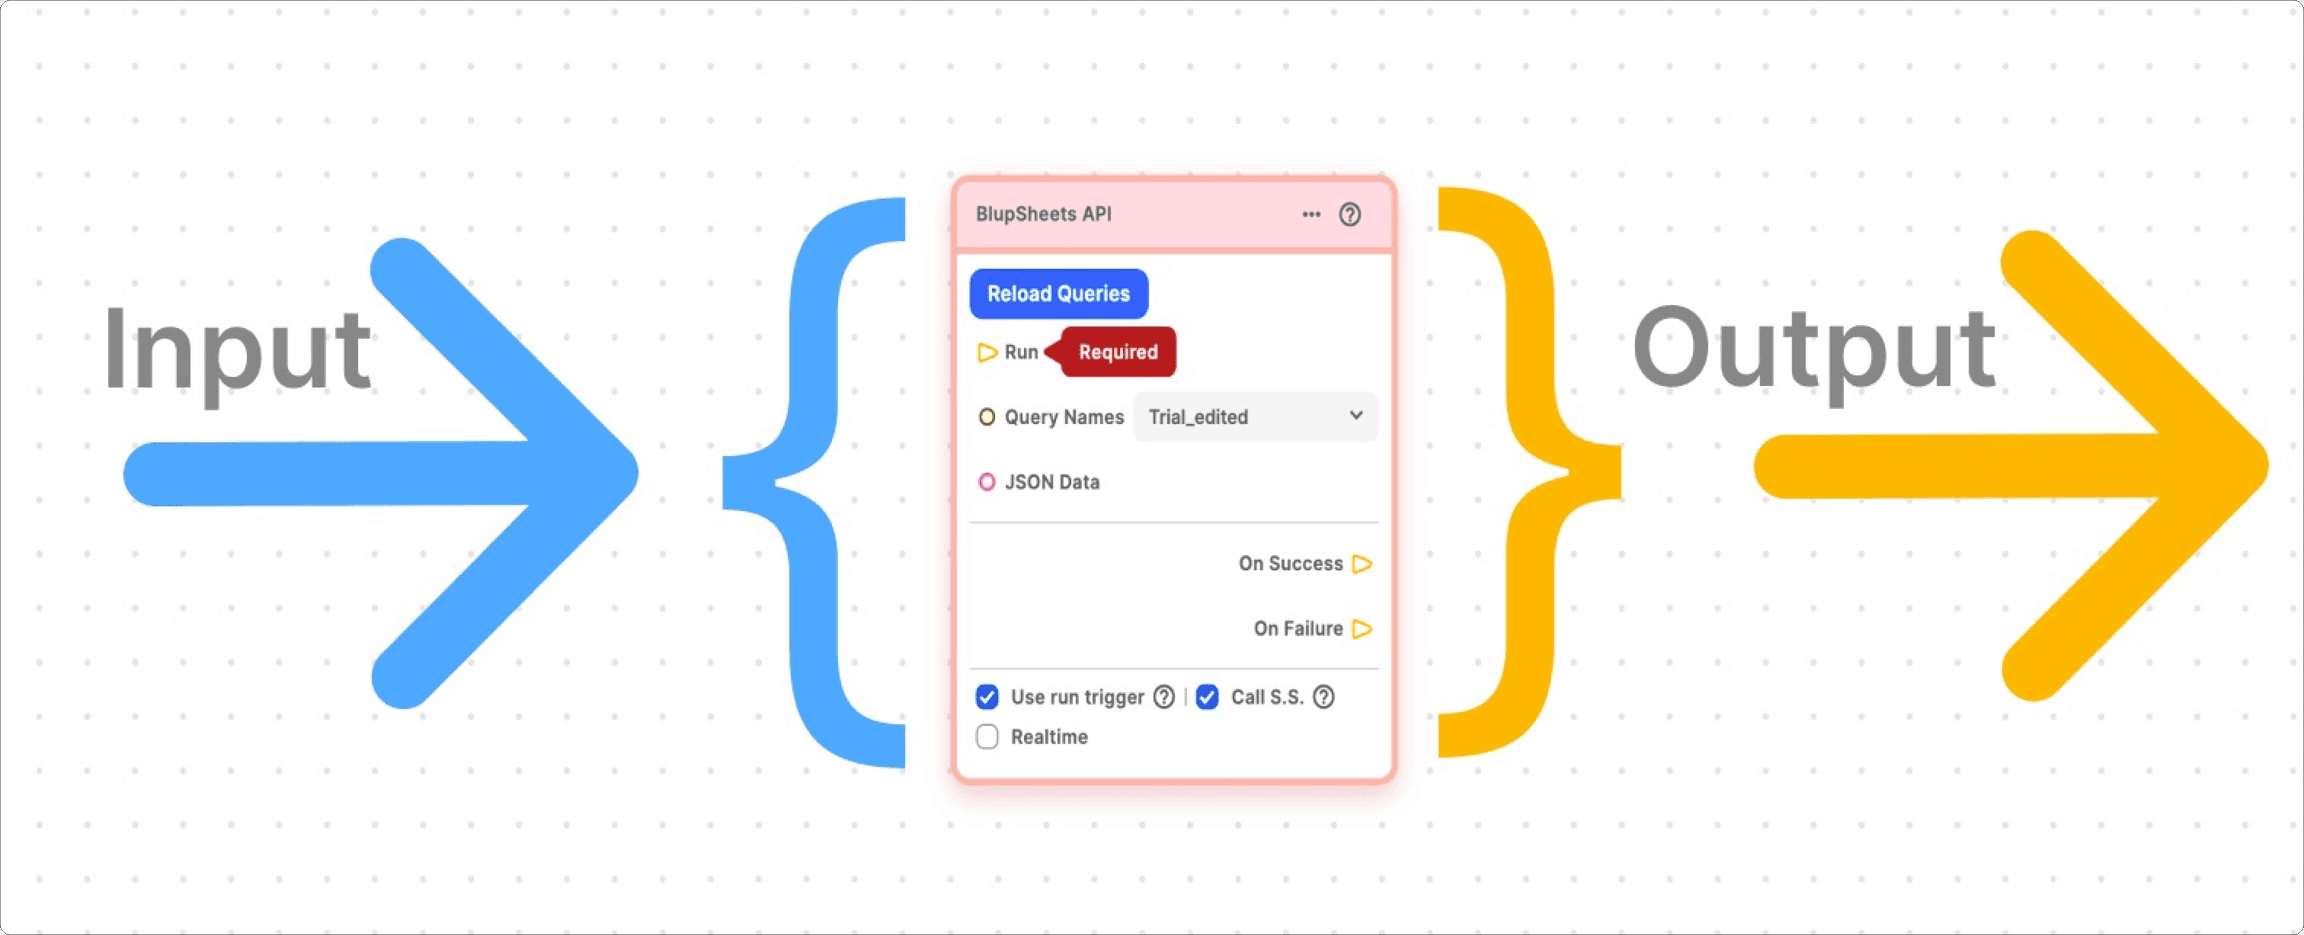
Understanding Node Structure
All nodes in Blup Lightning follow a similar structure:
The node's name is on the top center, indicating its category and intended task.
The left-hand side of each node accepts input, while the right-hand side provides output.
Node Points: Points on the node's outer surface to accept input, provide output, or navigate to another page. Node points only connect with points of the same type.
Circular Node Points: Color-coded according to data type.
Function Node Points: Triangular and not color-coded, used for sequencing actions.
List of Nodes Available in Logics
UI Nodes: Rectangle, Text, Group, List, Page ListView
Helper Nodes: Boolean, Date-Time, Double, Duration, Integers, Json, List, Map, String
Function Node Section
Variables Node Section
Maths Node Section
Flow Control Section
Relational Operators Section
Logical Operators Section
System Node Section
SDK Library Section
Blup Sheet API Node Section
Function Node Points
Function Node Points have two primary purposes:
Run Trigger: Starts or sequences actions within your logic.
Function Output Node Points: Trigger additional actions based on conditions.
For example, a Rectangle Node's on-click function node point runs logic when the user clicks on the rectangle. Some nodes generate additional output points for further flexibility.
Logics ⚡: Create Logics Visually
In Blup, the Logics module allows you to create and manage the logic for different widgets within your app. To access Logics in Blup, click on the Logics icon located on the top-left side, next to the Design panel, labeled Logics.
Dashboard
Logic Button
Clicking on the Logic button opens a Logic Console at the bottom for implementing your logics.
Logic Tab
Each tab corresponds to an individual page, encompassing all the logic associated with that specific page. These pages correspond to every app page in an application.
Add Node
The Add Node function allows you to choose which node to apply to your widget, whether you want to add functions, perform mathematical expressions, or other operations. You can also access the Add Node option by right-clicking on the logic console.
Search
The Search feature helps you find nodes added to the Logics App Page. Clicking on a node in the search results will zoom the Logics App Page to that node.
Debug Console
The Debug Console logs all app details during runtime to check for proper functionality, showing errors and print node outputs placed in your logic.
Logics Zoomer
This tool allows you to zoom in and out of the Logic app page for a better view of your logic nodes.
Logics Maximizer
It maximizes the Logic screen space within Blup, giving you more room to work on your logic.
Logics Menu
The Logics Menu includes options such as Refresh Logic, Help in Logic, Hide/Show Minimap, and Hide/Show Debug Console:
Refresh Logic: Refreshes all logic nodes.
Help in Logics: Opens a help box with information on how to use logic and node colors.
Hide/Show Minimap: Toggles a mini-map of the Logic console.
Hide/Show Debug Console: Toggles the debug console.
Logics App Page
This is where all logics are created by connecting or adding nodes, serving as the backbone of Blup for logic creation.
Understanding Node Structure
All nodes in Blup Lightning follow a similar structure:
The node's name is on the top center, indicating its category and intended task.
The left-hand side of each node accepts input, while the right-hand side provides output.
Node Points: Points on the node's outer surface to accept input, provide output, or navigate to another page. Node points only connect with points of the same type.
Circular Node Points: Color-coded according to data type.
Function Node Points: Triangular and not color-coded, used for sequencing actions.
List of Nodes Available in Logics
UI Nodes: Rectangle, Text, Group, List, Page ListView
Helper Nodes: Boolean, Date-Time, Double, Duration, Integers, Json, List, Map, String
Function Node Section
Variables Node Section
Maths Node Section
Flow Control Section
Relational Operators Section
Logical Operators Section
System Node Section
SDK Library Section
Blup Sheet API Node Section
Function Node Points
Function Node Points have two primary purposes:
Run Trigger: Starts or sequences actions within your logic.
Function Output Node Points: Trigger additional actions based on conditions.
For example, a Rectangle Node's on-click function node point runs logic when the user clicks on the rectangle. Some nodes generate additional output points for further flexibility.
Types of Logic Nodes
Types of Logic Nodes
Types of Logic Nodes
Types of Logic Nodes
Enter Blup Logic Nodes, a powerful toolset designed to streamline your development process, from connecting UI elements to integrating APIs and debugging flows. In this blog post, we'll dive deep into the different types of logic nodes available in Blup, exploring how each one contributes to building robust and dynamic applications.
Types of Logic Nodes in Blup
Blup Logic Nodes offer a diverse range of functionalities, empowering developers to create complex and interactive applications with ease. Let's explore some of the key types of logic nodes available:
UI Elements Nodes:
These nodes enable seamless interaction with various UI components, allowing developers to manipulate and update user interfaces dynamically. From buttons and text inputs to complex widgets, UI element nodes provide the building blocks for creating engaging user experiences.
Did you know? You can dynamically change the appearance of UI elements in response to user actions without writing extensive code. Imagine building an interactive form that adapts to user input in real time—how would that enhance your user experience?
API Integration Nodes:
Connecting your application to external APIs is made simple with API integration nodes. These nodes facilitate communication between your app and external services, allowing you to fetch data, perform actions, and synchronize information in real time.
Engaging Fact: Over 80% of mobile applications rely on some form of API integration. What external API would you integrate into your app to provide users with real-time updates or enhanced functionality?
Flow Control Nodes:
Managing the flow of your application's logic is made effortless with flow control nodes. Whether you need to implement conditional statements, loop through data, or handle asynchronous operations, flow control nodes provide the tools you need to orchestrate complex logic flows.
Thought-Provoking Question:
How would implementing an efficient flow control mechanism improve the performance and user experience of your app?
Relational and Logical Operator Nodes:
These nodes empower developers to perform comparisons, logical operations, and data transformations within their applications. Whether you're comparing values, combining conditions, or negating expressions, relational and logical operator nodes offer the flexibility to manipulate data effectively.
Interesting Insight:
Logical operations are the backbone of decision-making processes in programming. Can you think of a scenario where combining multiple conditions significantly improves the decision-making process in your app?
System Nodes:
System nodes provide access to essential system functionalities, such as accessing global variables, printing debug information, and managing widget lifecycle events. These nodes are indispensable for fine-tuning your application's behavior and ensuring optimal performance.
Fact: Efficient use of system nodes can reduce the debugging time by up to 50%. How would streamlined debugging impact your development cycle and project timelines?
SDK Library Nodes:
With SDK library nodes, developers can leverage a vast collection of libraries and packages available on Pub.dev. These nodes enable developers to enhance their applications with additional functionality, optimize their code, and improve overall performance.
Did you know?
Access to pre-built libraries can speed up development time by as much as 30%. What library or package have you found most useful in your development experience?
Blup Sheet API Nodes:
Blup Sheet API nodes facilitate seamless integration between your backend and UI components. These nodes allow you to retrieve data from external sources, handle success and failure scenarios, and visualize data execution in real time.
Thought-Provoking Question:
How would real-time data visualization improve the usability and responsiveness of your application?
By leveraging the diverse range of logic nodes available in Blup, developers can build robust, feature-rich applications that meet the needs of their users. Whether you're creating a simple mobile app or a complex web application, Blup Logic Nodes provide the flexibility and scalability you need to bring your ideas to life.
Engage with the Community
Now that you've learned about the various types of logic nodes in Blup, it's time to put your knowledge into action. Which type of logic node are you most excited to use in your next project? Share your thoughts with the community and discover how other developers are leveraging Blup Logic Nodes to build innovative applications.

Join the Conversation: How have Blup Logic Nodes transformed your development process? Share your experiences and tips with fellow developers in the comments below!
Enter Blup Logic Nodes, a powerful toolset designed to streamline your development process, from connecting UI elements to integrating APIs and debugging flows. In this blog post, we'll dive deep into the different types of logic nodes available in Blup, exploring how each one contributes to building robust and dynamic applications.
Types of Logic Nodes in Blup
Blup Logic Nodes offer a diverse range of functionalities, empowering developers to create complex and interactive applications with ease. Let's explore some of the key types of logic nodes available:
UI Elements Nodes:
These nodes enable seamless interaction with various UI components, allowing developers to manipulate and update user interfaces dynamically. From buttons and text inputs to complex widgets, UI element nodes provide the building blocks for creating engaging user experiences.
Did you know? You can dynamically change the appearance of UI elements in response to user actions without writing extensive code. Imagine building an interactive form that adapts to user input in real time—how would that enhance your user experience?
API Integration Nodes:
Connecting your application to external APIs is made simple with API integration nodes. These nodes facilitate communication between your app and external services, allowing you to fetch data, perform actions, and synchronize information in real time.
Engaging Fact: Over 80% of mobile applications rely on some form of API integration. What external API would you integrate into your app to provide users with real-time updates or enhanced functionality?
Flow Control Nodes:
Managing the flow of your application's logic is made effortless with flow control nodes. Whether you need to implement conditional statements, loop through data, or handle asynchronous operations, flow control nodes provide the tools you need to orchestrate complex logic flows.
Thought-Provoking Question:
How would implementing an efficient flow control mechanism improve the performance and user experience of your app?
Relational and Logical Operator Nodes:
These nodes empower developers to perform comparisons, logical operations, and data transformations within their applications. Whether you're comparing values, combining conditions, or negating expressions, relational and logical operator nodes offer the flexibility to manipulate data effectively.
Interesting Insight:
Logical operations are the backbone of decision-making processes in programming. Can you think of a scenario where combining multiple conditions significantly improves the decision-making process in your app?
System Nodes:
System nodes provide access to essential system functionalities, such as accessing global variables, printing debug information, and managing widget lifecycle events. These nodes are indispensable for fine-tuning your application's behavior and ensuring optimal performance.
Fact: Efficient use of system nodes can reduce the debugging time by up to 50%. How would streamlined debugging impact your development cycle and project timelines?
SDK Library Nodes:
With SDK library nodes, developers can leverage a vast collection of libraries and packages available on Pub.dev. These nodes enable developers to enhance their applications with additional functionality, optimize their code, and improve overall performance.
Did you know?
Access to pre-built libraries can speed up development time by as much as 30%. What library or package have you found most useful in your development experience?
Blup Sheet API Nodes:
Blup Sheet API nodes facilitate seamless integration between your backend and UI components. These nodes allow you to retrieve data from external sources, handle success and failure scenarios, and visualize data execution in real time.
Thought-Provoking Question:
How would real-time data visualization improve the usability and responsiveness of your application?
By leveraging the diverse range of logic nodes available in Blup, developers can build robust, feature-rich applications that meet the needs of their users. Whether you're creating a simple mobile app or a complex web application, Blup Logic Nodes provide the flexibility and scalability you need to bring your ideas to life.
Engage with the Community
Now that you've learned about the various types of logic nodes in Blup, it's time to put your knowledge into action. Which type of logic node are you most excited to use in your next project? Share your thoughts with the community and discover how other developers are leveraging Blup Logic Nodes to build innovative applications.
Join the Conversation: How have Blup Logic Nodes transformed your development process? Share your experiences and tips with fellow developers in the comments below!
Connecting UI Elements
Connecting UI Elements
Connecting UI Elements
Connecting UI Elements
Blup Logic Nodes provides a streamlined approach to bridge the gap between your UI components and the underlying logic, making it easier to create interactive and responsive applications. In this section, we will provide a step-by-step guide on how to connect UI elements to logic nodes, using common UI nodes like Rectangle, Text, Group, List, and Page ListView.
Connecting UI Elements to Logic Nodes ⚡
Connecting UI elements to logic nodes is a crucial step in building interactive applications. Here’s a detailed guide on how to achieve this:
Step 1: Setting Up Your Project
Open Blup: Start by opening your Blup project where you want to connect UI elements to logic nodes.
Navigate to Blup Logic Editor: Go to the Blup Logic Editor where you can see all available logic nodes and UI elements.
Step 2: Adding UI Elements
Add UI Components: Drag and drop the desired UI components (e.g., Rectangle, Text, Group, List, Page ListView) onto your canvas.
Configure UI Elements: Adjust the properties of these UI elements as needed (size, color, text, etc.).
Step 3: Connecting Logic Nodes
Select a UI Element: Click on the UI element you want to connect to a logic node.
Choose a Logic Node: Drag and drop a logic node from the Blup Logic Editor to the canvas.
Link UI Element to Logic Node: Connect the UI element to the appropriate input/output points of the logic node by dragging a connector between them.
Examples of Connecting Common UI Node

1. Rectangle Node
Example: Changing the color of a rectangle based on a condition.
Add Rectangle: Place a Rectangle UI element on the canvas.
Add Logic Node: Drag an If-Else node from the logic editor.
Configure Condition: Set up the condition in the If-Else node (e.g., a variable determining whether the rectangle should be red or blue).
Connect Nodes: Connect the Rectangle’s property (like color) to the output of the If-Else node. When the condition is true, set the color to red; otherwise, set it to blue.
2. Text Node
Example: Updating text based on user input.
Add Text Node: Place a Text UI element on the canvas.
Add Input Node: Drag a Text Input node from the logic editor.
Connect Input to Text: Connect the output of the Text Input node to the Text node. This way, whatever the user types will be displayed in the Text UI element.
3. Group Node
Example: Showing or hiding a group of elements.
Add Group: Group several UI elements together.
Add Toggle Node: Drag a Toggle node from the logic editor.
Connect Toggle to Group: Connect the Toggle node to the Group’s visibility property. Use a button or other trigger to change the visibility of the group based on the toggle state.
4. List Node
Example: Displaying a list of items fetched from an API.
Add List Node: Place a List UI element on the canvas.
Add API Node: Drag an API Integration node from the logic editor.
Fetch Data: Configure the API node to fetch data from a desired endpoint.
Connect API to List: Connect the output of the API node (the data) to the List node. This will populate the list with items fetched from the API.
5. Page ListView Node
Example: Paginating through data.
Add Page ListView: Place a Page ListView UI element on the canvas.
Add Pagination Logic: Drag a logic node that handles pagination (like a Next Page node).
Connect Pagination: Connect the pagination logic to the Page ListView node. Use buttons or swipe gestures to navigate through pages of data.
Step 4: Testing Your Connections
Run Your Project: Start your application to see the connected logic nodes in action.
Debug If Necessary: Use the Debug Print node to print values to the console and ensure everything is working as expected.
Tips for Effective Use of Logic Nodes
Modular Design: Break down your logic into smaller, reusable components. This makes your logic easier to manage and debug.
Real-time Feedback: Utilize real-time data visualization features to see how data flows through your logic nodes, making it easier to spot and fix issues.
Efficient Debugging: Leverage the Debug Print node to output values and states to the console. This can significantly speed up your debugging process.
Engaging Fact: Did you know that connecting UI elements to logic nodes can reduce the amount of code you need to write by up to 40%? This not only saves time but also minimizes the risk of errors.
Thought-provoking Question: How could dynamic UI updates improve the user experience in your next project? Imagine an app where the UI seamlessly adapts to user interactions—what possibilities does that open up for your application?
By following these steps and utilizing Blup Logic Nodes effectively, you can create dynamic, interactive, and efficient applications. The power of connecting UI elements to logic nodes lies in its ability to streamline development and enhance the user experience, making your apps more responsive and engaging.
Now that you know how to connect UI elements to logic nodes, what new features will you implement in your app? Share your ideas and experiences with the community in the comments below!
Blup Logic Nodes provides a streamlined approach to bridge the gap between your UI components and the underlying logic, making it easier to create interactive and responsive applications. In this section, we will provide a step-by-step guide on how to connect UI elements to logic nodes, using common UI nodes like Rectangle, Text, Group, List, and Page ListView.
Connecting UI Elements to Logic Nodes ⚡
Connecting UI elements to logic nodes is a crucial step in building interactive applications. Here’s a detailed guide on how to achieve this:
Step 1: Setting Up Your Project
Open Blup: Start by opening your Blup project where you want to connect UI elements to logic nodes.
Navigate to Blup Logic Editor: Go to the Blup Logic Editor where you can see all available logic nodes and UI elements.
Step 2: Adding UI Elements
Add UI Components: Drag and drop the desired UI components (e.g., Rectangle, Text, Group, List, Page ListView) onto your canvas.
Configure UI Elements: Adjust the properties of these UI elements as needed (size, color, text, etc.).
Step 3: Connecting Logic Nodes
Select a UI Element: Click on the UI element you want to connect to a logic node.
Choose a Logic Node: Drag and drop a logic node from the Blup Logic Editor to the canvas.
Link UI Element to Logic Node: Connect the UI element to the appropriate input/output points of the logic node by dragging a connector between them.
Examples of Connecting Common UI Node
1. Rectangle Node
Example: Changing the color of a rectangle based on a condition.
Add Rectangle: Place a Rectangle UI element on the canvas.
Add Logic Node: Drag an If-Else node from the logic editor.
Configure Condition: Set up the condition in the If-Else node (e.g., a variable determining whether the rectangle should be red or blue).
Connect Nodes: Connect the Rectangle’s property (like color) to the output of the If-Else node. When the condition is true, set the color to red; otherwise, set it to blue.
2. Text Node
Example: Updating text based on user input.
Add Text Node: Place a Text UI element on the canvas.
Add Input Node: Drag a Text Input node from the logic editor.
Connect Input to Text: Connect the output of the Text Input node to the Text node. This way, whatever the user types will be displayed in the Text UI element.
3. Group Node
Example: Showing or hiding a group of elements.
Add Group: Group several UI elements together.
Add Toggle Node: Drag a Toggle node from the logic editor.
Connect Toggle to Group: Connect the Toggle node to the Group’s visibility property. Use a button or other trigger to change the visibility of the group based on the toggle state.
4. List Node
Example: Displaying a list of items fetched from an API.
Add List Node: Place a List UI element on the canvas.
Add API Node: Drag an API Integration node from the logic editor.
Fetch Data: Configure the API node to fetch data from a desired endpoint.
Connect API to List: Connect the output of the API node (the data) to the List node. This will populate the list with items fetched from the API.
5. Page ListView Node
Example: Paginating through data.
Add Page ListView: Place a Page ListView UI element on the canvas.
Add Pagination Logic: Drag a logic node that handles pagination (like a Next Page node).
Connect Pagination: Connect the pagination logic to the Page ListView node. Use buttons or swipe gestures to navigate through pages of data.
Step 4: Testing Your Connections
Run Your Project: Start your application to see the connected logic nodes in action.
Debug If Necessary: Use the Debug Print node to print values to the console and ensure everything is working as expected.
Tips for Effective Use of Logic Nodes
Modular Design: Break down your logic into smaller, reusable components. This makes your logic easier to manage and debug.
Real-time Feedback: Utilize real-time data visualization features to see how data flows through your logic nodes, making it easier to spot and fix issues.
Efficient Debugging: Leverage the Debug Print node to output values and states to the console. This can significantly speed up your debugging process.
Engaging Fact: Did you know that connecting UI elements to logic nodes can reduce the amount of code you need to write by up to 40%? This not only saves time but also minimizes the risk of errors.
Thought-provoking Question: How could dynamic UI updates improve the user experience in your next project? Imagine an app where the UI seamlessly adapts to user interactions—what possibilities does that open up for your application?
By following these steps and utilizing Blup Logic Nodes effectively, you can create dynamic, interactive, and efficient applications. The power of connecting UI elements to logic nodes lies in its ability to streamline development and enhance the user experience, making your apps more responsive and engaging.
Now that you know how to connect UI elements to logic nodes, what new features will you implement in your app? Share your ideas and experiences with the community in the comments below!
Integrating Third-Party APIs
Integrating Third-Party APIs
Integrating Third-Party APIs
Integrating Third-Party APIs
Integrating third-party APIs into your application is a game-changer, providing access to external data, services, and functionalities that can significantly enhance your app's capabilities. With Blup Logic Nodes, integrating these APIs becomes a seamless process. Let's explore how you can integrate third-party APIs into your Blup project and the benefits of doing so.

Explanation of the Process for Integrating Third-Party APIs
Navigate to the Blup Logics Terminal:
Start by opening the Blup Logics Terminal. This is your control center for managing the logic and integration aspects of your application.
Select the SDK Library (Pub.dev):
Access the SDK Library from the terminal. Here, you'll find a comprehensive collection of libraries and packages available on Pub.dev, which you can use to integrate third-party APIs.
Explore and Select Libraries:
Browse through the available libraries and packages. If the desired library for API integration is not listed, you can search for it on the Pub.dev website. Once you find the appropriate library, you can add the necessary code snippets to the "Insert Code" node in Blup Logic.
Insert Code Snippet:
Copy the code snippet of the desired library or package from the Pub.dev website. In Blup Logic, navigate to the "Insert Code" node and paste the code snippet. Select the appropriate method from the dropdown menu to integrate it into your application.
Configure API Requests:
Use the Blup Logic Nodes to set up API requests. This involves defining the endpoint, request method (GET, POST, etc.), and any required headers or parameters. You can use nodes like "HTTP Request" to manage these configurations.
Handle API Responses:
Once the API request is configured, handle the responses using appropriate nodes. You can process the JSON data, display it in the UI, or use it to trigger other logic flows within your application.
Test and Debug:
After integrating the API, thoroughly test your application to ensure that the API interactions work as expected. Use the "Debug Print" node to print data values to the debug console, aiding in troubleshooting any issues that arise.
Benefits of Integrating APIs
Access External Data: Fetch real-time data and services, such as weather updates or social media integrations.
Enhanced Functionality: Add advanced features like payment gateways or geolocation services without building from scratch.
Improved Efficiency: Reduce development time by leveraging pre-built services.
Scalability: Easily add new features as your application grows.
Real-Time Data: Provide users with up-to-date information seamlessly.
Engaging Fact: Over 83% of web traffic is generated through API interactions.
Thought-Provoking Question: What third-party API would you integrate into your app to provide unique features?
Integrating third-party APIs can transform your application, making it more powerful and versatile. Share your ideas and experiences with the community in the comments below!
Integrating third-party APIs into your application is a game-changer, providing access to external data, services, and functionalities that can significantly enhance your app's capabilities. With Blup Logic Nodes, integrating these APIs becomes a seamless process. Let's explore how you can integrate third-party APIs into your Blup project and the benefits of doing so.
Explanation of the Process for Integrating Third-Party APIs
Navigate to the Blup Logics Terminal:
Start by opening the Blup Logics Terminal. This is your control center for managing the logic and integration aspects of your application.
Select the SDK Library (Pub.dev):
Access the SDK Library from the terminal. Here, you'll find a comprehensive collection of libraries and packages available on Pub.dev, which you can use to integrate third-party APIs.
Explore and Select Libraries:
Browse through the available libraries and packages. If the desired library for API integration is not listed, you can search for it on the Pub.dev website. Once you find the appropriate library, you can add the necessary code snippets to the "Insert Code" node in Blup Logic.
Insert Code Snippet:
Copy the code snippet of the desired library or package from the Pub.dev website. In Blup Logic, navigate to the "Insert Code" node and paste the code snippet. Select the appropriate method from the dropdown menu to integrate it into your application.
Configure API Requests:
Use the Blup Logic Nodes to set up API requests. This involves defining the endpoint, request method (GET, POST, etc.), and any required headers or parameters. You can use nodes like "HTTP Request" to manage these configurations.
Handle API Responses:
Once the API request is configured, handle the responses using appropriate nodes. You can process the JSON data, display it in the UI, or use it to trigger other logic flows within your application.
Test and Debug:
After integrating the API, thoroughly test your application to ensure that the API interactions work as expected. Use the "Debug Print" node to print data values to the debug console, aiding in troubleshooting any issues that arise.
Benefits of Integrating APIs
Access External Data: Fetch real-time data and services, such as weather updates or social media integrations.
Enhanced Functionality: Add advanced features like payment gateways or geolocation services without building from scratch.
Improved Efficiency: Reduce development time by leveraging pre-built services.
Scalability: Easily add new features as your application grows.
Real-Time Data: Provide users with up-to-date information seamlessly.
Engaging Fact: Over 83% of web traffic is generated through API interactions.
Thought-Provoking Question: What third-party API would you integrate into your app to provide unique features?
Integrating third-party APIs can transform your application, making it more powerful and versatile. Share your ideas and experiences with the community in the comments below!
Debugging Logic Flows
Debugging Logic Flows
Debugging Logic Flows
Debugging Logic Flows
Debugging is a crucial aspect of the development process. It ensures that your application runs smoothly and helps identify and fix issues quickly. Blup provides a comprehensive set of tools and practices for debugging logic flows, making it easier for developers to maintain the integrity of their applications.
Tips and Tools Available in Blup for Debugging Logic Flow
Debug Print Node: The Debug Print Node is one of the most powerful tools for debugging in Blup. It allows developers to print data values to the debug console, helping them understand the flow of data and identify any discrepancies.
Pro Tip: Use meaningful messages in your Debug Print Nodes to provide context for the values being printed. For example, instead of just printing a variable, print a message like
"User Age: " + userAge.toString().Use Run Trigger: Many nodes in Blup have a "Use Run Trigger" checkbox. Enabling this allows you to control when specific nodes are executed, which is essential for debugging complex logic flows.
Did you know? Carefully placing Run Triggers can help you isolate parts of your logic flow, making it easier to pinpoint the exact location of any issues.
Step-by-Step Execution: By breaking down your logic into smaller, manageable steps, you can more easily identify where things might be going wrong. Use the flow control nodes to create checkpoints in your logic.
Engaging Fact: Debugging step-by-step can reduce the time spent on troubleshooting by up to 40%.
Common Debugging Practices and Troubleshooting
Start Simple: Begin by testing small sections of your logic flow independently. This can help you verify that each part is working correctly before integrating them into a more complex flow.
Question for Reflection: What small, independent sections can you test in your current project to ensure each component works as expected?
Check Data Types: Ensure that the data types used in your logic flows are consistent and compatible. Mismatched data types can lead to unexpected behavior and errors.
Interesting Insight: Over 60% of runtime errors in applications are due to data type mismatches.
Use Comments and Documentation: Document your logic flows with comments to explain the purpose of each node and the overall flow. This practice not only helps in debugging but also makes your code more maintainable.
Thought-Provoking Question: How can better documentation and comments improve the debugging process in your project?
Reusing Logic Flows
Reusing Logic Flows
Reusing Logic Flows
Reusing Logic Flows
One of the standout features of Blup is the ability to save and reuse logic flows across multiple projects. This capability significantly enhances development efficiency and consistency.
Guide on How to Save and Reuse Logic Flows in Multiple Projects
Save Logic Flow as Template:
After creating a logic flow,save it as a template within Blup. This allows you to easily access and import the same flow in different projects.
Step-by-Step Guide:
Complete your logic flow in your current project.
Right-click on the logic flow canvas and select "Save as Template."
Name your template and save it to your library for future use.
Import Logic Flow into New Project:
When starting a new project, import your saved logic flow template to reuse the same logic without having to recreate it from scratch.
Step-by-Step Guide:
Open your new project.
Navigate to the templates library and select the previously saved logic flow.
Import the template into your current project, making any necessary adjustments to fit the new context.
Best Practices for Creating Reusable Logic Components
Modular Design: Design your logic flows in a modular fashion. Each module should perform a specific function and be as independent as possible. This modularity makes it easier to reuse and maintain components across different projects.
Fact: Modular design can reduce development time by up to 50% when reusing components.
Parameterize Logic Flows: Use parameters and variables to make your logic flows adaptable to different contexts. Instead of hardcoding values, use inputs that can be easily modified when reusing the flow in another project.
Pro Tip: Think of your logic flow as a function with inputs and outputs. The more flexible and parameterized it is, the more reusable it becomes.
Document Your Logic Flows: Document the purpose and functionality of each logic flow. Include information on required inputs, expected outputs, and any dependencies. Good documentation ensures that you and other developers can understand and effectively reuse the logic.
Question for Reflection: How detailed is your current documentation? What improvements can you make to ensure better reusability of your logic flows?
Test Thoroughly Before Saving as a Template: Ensure that your logic flow works correctly and handles edge cases before saving it as a template. Thorough testing prevents issues when reusing the flow in other projects.
Thought-provoking Question: Have you encountered issues due to insufficient testing of reusable components? How can you improve your testing process to avoid such problems?
Blup Logic FAQs
Blup Logic FAQs
Blup Logic FAQs
Blup Logic FAQs
Here are all possible FAQs about Blup Logic:
General Questions
What is Blup Logics?
Blup Logics is a system that allows you to add interactions and backend functionality to your app's UI. It supports a variety of nodes, including UI elements, variables, and third-party SDKs.
How do I access Blup Logics?
Right-click on any UI component and select "Add Logics" from the context menu to open the Logic Panel.
Nodes and Functionality
What are UI Nodes in Blup Logics?
UI Nodes are used to interact with and manipulate UI components within your Blup project.
What are Helper Nodes?
Helper Nodes perform utility functions such as string manipulation, date-time operations, and other helper functions that assist in logic creation.
What are Conditional Nodes?
Conditional Nodes allow you to perform operations based on conditions, helping you to create dynamic and responsive logic flows.
What are Relational Operators?
Relational Operators in Blup Logics are used to compare values, enabling the creation of conditional logic based on these comparisons.
Variables and Data Handling
Can I use custom variables in Blup Logics?
Yes, you can define custom variables for various data types, including strings, integers, and booleans, to use within your logic flows.
How do I perform mathematical operations in Blup Logics?
Use nodes from the "Maths Node Section" to perform various mathematical operations such as addition, subtraction, multiplication, and division.
Backend and API Integration
How do I connect my logic to backend services?
Utilize the "Blup Sheet API Node Section" to interact with backend services and APIs.
What is the SDK Library Section?
The SDK Library Section provides access to various third-party SDKs hosted on pub.dev, allowing you to integrate additional functionalities into your app.
Grouping and Organizing
Is it possible to group multiple logic nodes?
Yes, you can group nodes for better organization and readability within your logic flows.
Specific Use Cases
How do I use conditional logic in Blup?
Use nodes from the "Flow Control" section to create conditional operations, enabling your app to respond dynamically based on user interactions or other conditions.
For more detailed information, visit the Blup Documentation.
Download Blup
Download Blup
Download Blup
Download Blup
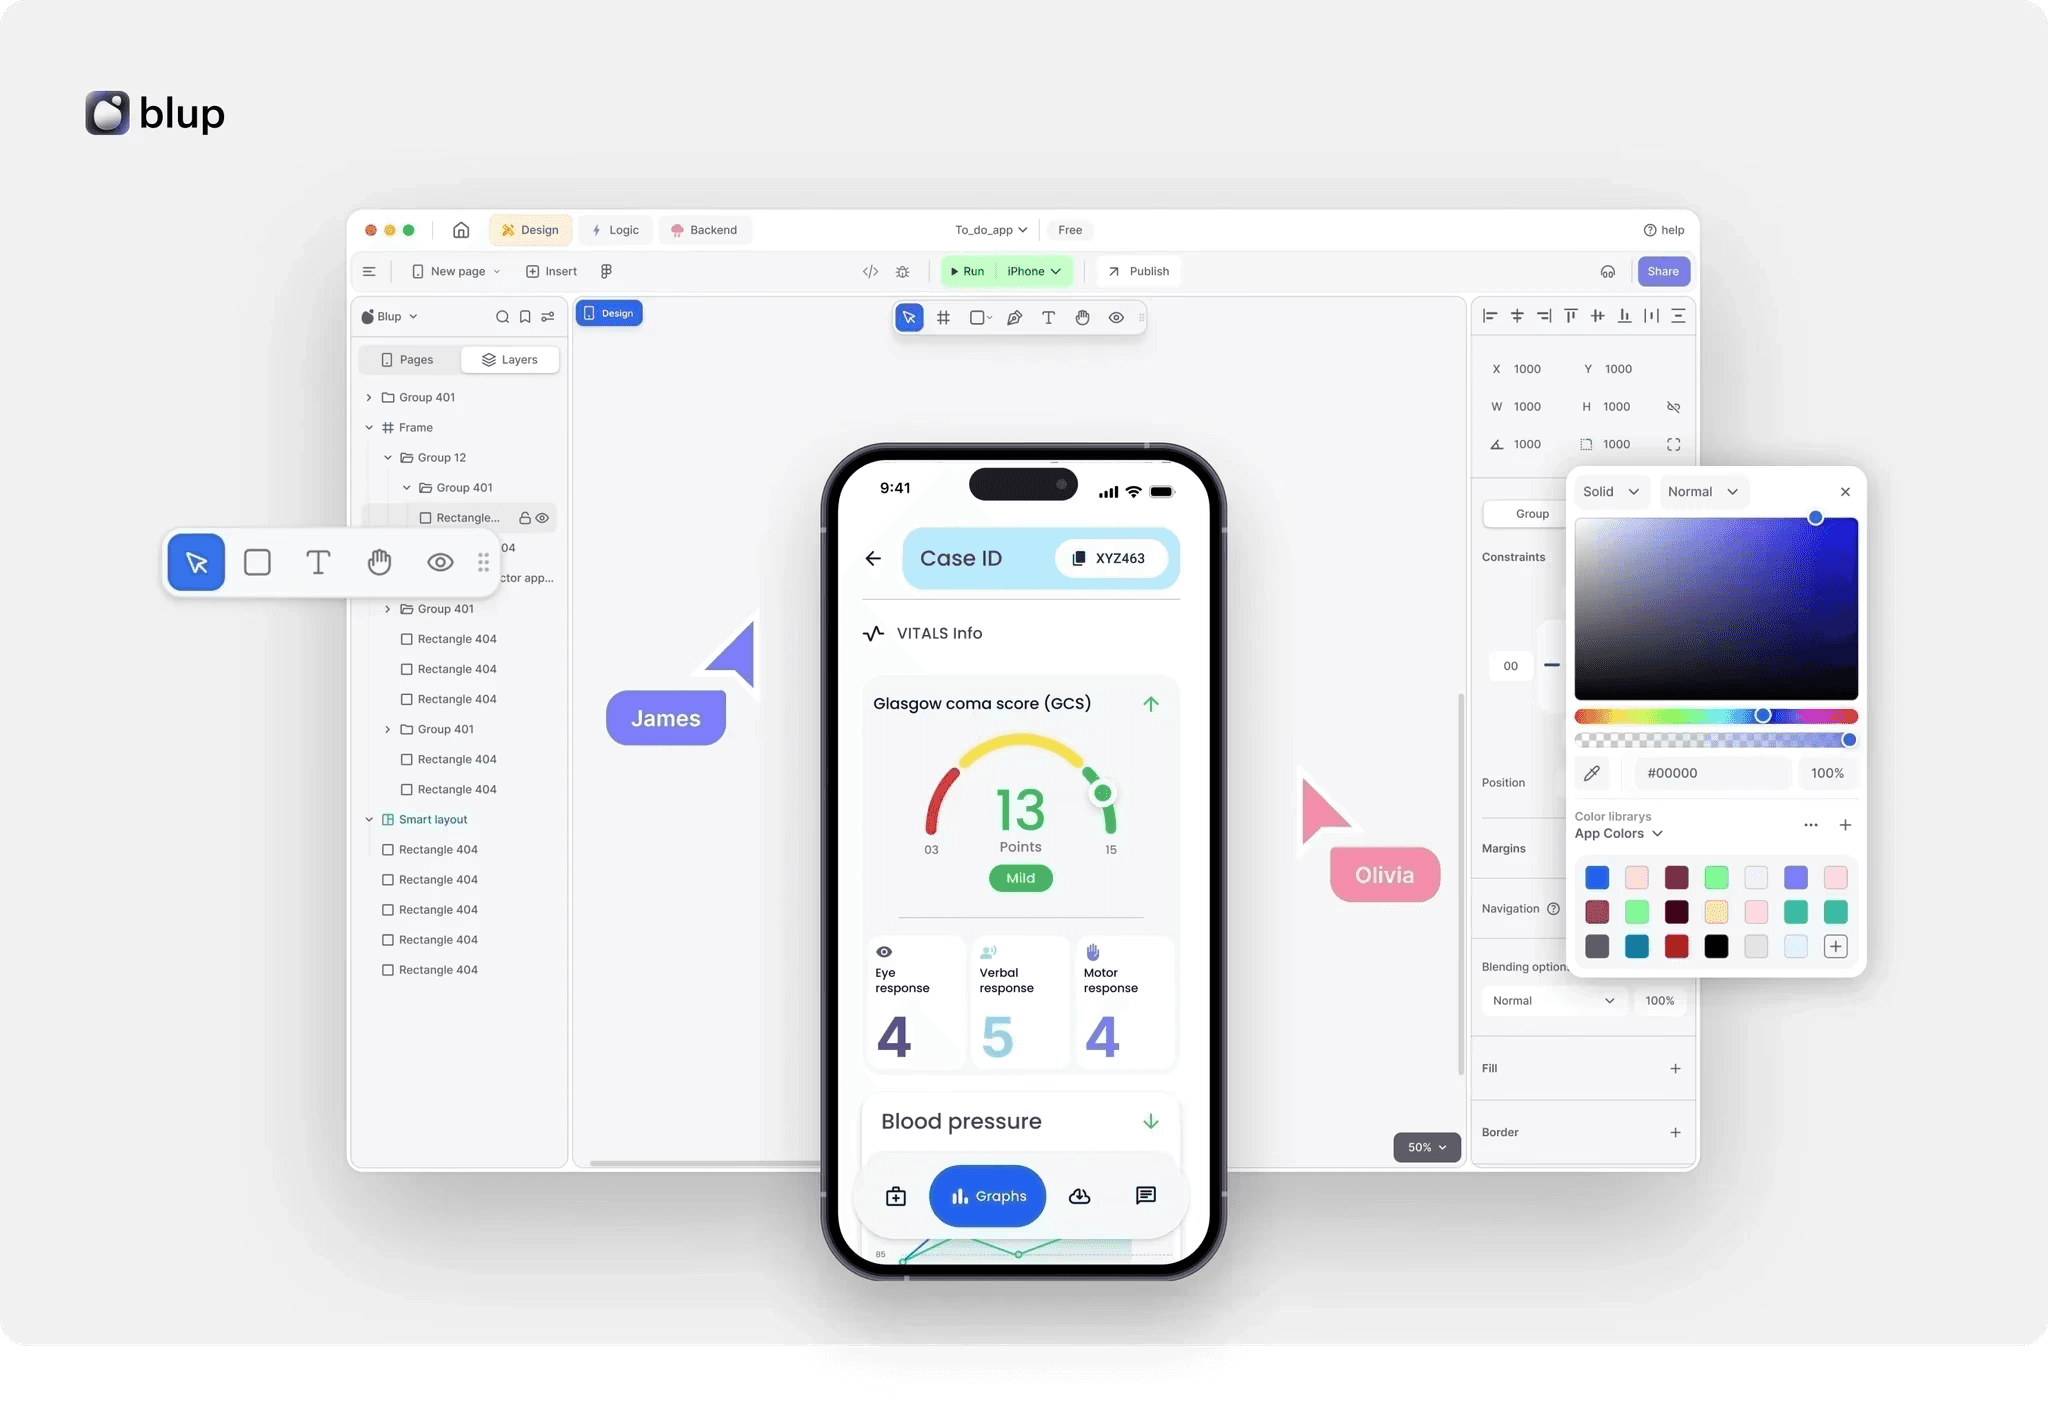
Download Blup Tool: Your All-in-One Flutter IDE
Blup simplifies Flutter app development by integrating design, logic, and backend functionalities in one platform. Here’s how to get started:
Visit Blup's Website: Blup Official Site
Sign Up or Log In: Create or access your account.
Download: Choose the version for your OS (Windows, macOS, Linux).
Install and Launch: Follow on-screen instructions to install Blup.
Conclusion
Conclusion
Conclusion
Conclusion
In this comprehensive guide, we've delved into the intricacies of Blup Logic Nodes, exploring how they empower developers to build dynamic and efficient applications. Let's recap the key points we've covered and encourage you to explore and utilize Blup's logic section for enhanced app development.
Recap of Key Points:
Versatility of Blup Logic Nodes: We delved into the myriad functionalities of Blup Logic Nodes, spanning from connecting UI elements to integrating APIs and debugging flows.
Debugging Practices: We discussed common debugging practices and troubleshooting techniques, highlighting the tools available in Blup to streamline the debugging process.
Reuse of Logic Components: Our guide provided insights into saving and reusing logic flows across different projects, along with best practices for creating reusable logic components.
Happy Coding!
Join the Blup community, experiment with different techniques, and unleash your creativity. With Blup, the possibilities are endless. Happy coding!
Table of content


© 2021-25 Blupx Private Limited.
All rights reserved.
© 2021-25 Blupx Private Limited.
All rights reserved.
© 2021-25 Blupx Private Limited.
All rights reserved.