

Networking & http in flutter: Communicate with WebSockets
WebSockets offer a powerful way to enable real-time, two-way communication with servers. Unlike traditional HTTP requests, which require polling for updates, WebSockets allow persistent connections, facilitating instantaneous data exchange. In this blog post, we’ll explore how to set up WebSocket communication in Flutter by connecting to a test WebSocket server provided by Lob.com. The server echoes back any message you send, allowing us to verify the connection easily.
Overview of Steps
This example will guide you through the following steps:
Connect to a WebSocket server.
Listen for messages from the server.
Send data to the server.
Close the WebSocket connection.
What are WebSockets?
What are WebSockets?
What are WebSockets?
What are WebSockets?
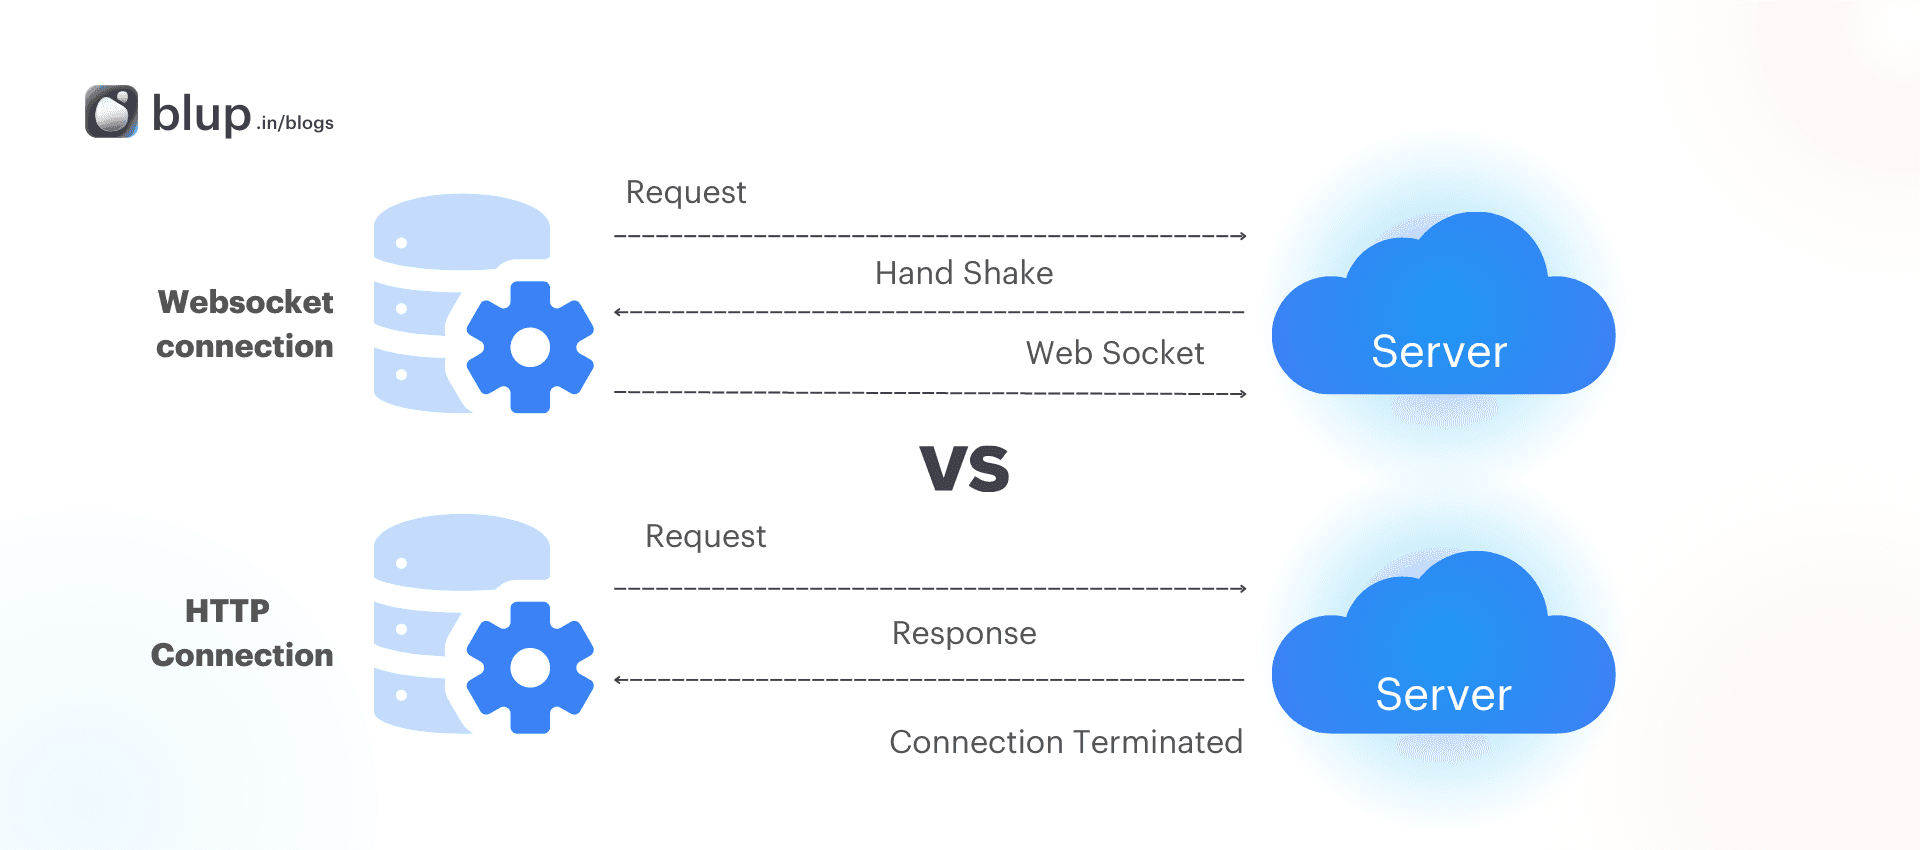
WebSockets are a protocol for full-duplex communication channels over a single TCP connection. Unlike traditional HTTP requests, which require the client to send a request and wait for a response, WebSockets allow for a persistent connection, enabling the server to send data to the client at any time. This feature makes WebSockets particularly useful for applications that require real-time updates, such as live chat applications or stock price tickers.
Why Use WebSockets in Flutter?
Flutter, a versatile framework for building natively compiled applications, supports various networking protocols, including WebSockets. Here are some key benefits of using WebSockets in Flutter:
Real-time Communication: WebSockets enable immediate data exchange between the client and server.
Reduced Latency: Once the connection is established, data can flow freely without the overhead of HTTP requests.
Lower Bandwidth Usage: WebSockets can be more efficient in bandwidth usage, especially for applications requiring frequent updates.
Getting Started with WebSockets in Flutter
Getting Started with WebSockets in Flutter
Getting Started with WebSockets in Flutter
Getting Started with WebSockets in Flutter
Before we dive into the implementation, ensure you have the Flutter SDK installed and a basic understanding of Flutter concepts.
Step 1: Setting Up Your Flutter Project
Create a new Flutter project by running:
Step 2: Adding Dependencies
You don’t need any special dependencies to work with WebSockets in Flutter as it comes with a built-in dart:io library. However, you might want to use the web_socket_channel package for easier WebSocket communication. Add the dependency to your pubspec.yaml file:
dependencies:
  flutter:
    sdk: flutter
  web_socket_channel: ^2.1.0  # Check for the latest version
Run flutter pub get to install the package.
Step 3: Connecting to a WebSocket Server
To illustrate WebSocket communication, we will connect to a test WebSocket server provided by Lob.com. The server echoes back any message sent to it, making it perfect for our demonstration.
Here’s how to establish a connection:
import 'package:flutter/material.dart';
import 'package:web_socket_channel/web_socket_channel.dart';

class WebSocketDemo extends StatefulWidget {
  @override
  _WebSocketDemoState createState() => _WebSocketDemoState();
}

class _WebSocketDemoState extends State<WebSocketDemo> {
  final WebSocketChannel _channel = WebSocketChannel.connect(
    Uri.parse('wss://echo.websocket.org'),
  );

  @override
  void dispose() {
    _channel.sink.close();
    super.dispose();
  }

  @override
  Widget build(BuildContext context) {
    return Scaffold(
      appBar: AppBar(
        title: Text('WebSocket Demo'),
      ),
      body: Center(
        child: Text('Connected to WebSocket server!'),
      ),
    );
  }
}

void main() {
  runApp(MaterialApp(home: WebSocketDemo()));
}
Step 4: Listening for Messages from the Server
To listen for messages from the server, we can use the StreamBuilder widget. This widget will automatically rebuild its child when new data is received from the WebSocket server.
Modify the _WebSocketDemoState class to include a StreamBuilder:
@override
Widget build(BuildContext context) {
  return Scaffold(
    appBar: AppBar(
      title: Text('WebSocket Demo'),
    ),
    body: Column(
      children: [
        Expanded(
          child: StreamBuilder(
            stream: _channel.stream,
            builder: (context, snapshot) {
              if (snapshot.hasData) {
                return Text('Received: ${snapshot.data}');
              }
              return CircularProgressIndicator();
            },
          ),
        ),
        TextField(
          onSubmitted: (message) {
            _channel.sink.add(message);
          },
          decoration: InputDecoration(
            labelText: 'Send a message',
          ),
        ),
      ],
    ),
  );
}
Step 5: Sending Data to the Server
In the above code, we added a TextField to send messages to the WebSocket server. When a message is submitted, it is sent to the server using _channel.sink.add(message).
Step 6: Closing the WebSocket Connection
It’s important to close the WebSocket connection when it’s no longer needed to free up resources. We can do this in the dispose method:
@override
void dispose() {
  _channel.sink.close();
  super.dispose();
}
Complete Example
Complete Example
Complete Example
Complete Example
Here’s the complete code for the WebSocket demo application:
import 'package:flutter/material.dart';
import 'package:web_socket_channel/web_socket_channel.dart';

class WebSocketDemo extends StatefulWidget {
  @override
  _WebSocketDemoState createState() => _WebSocketDemoState();
}

class _WebSocketDemoState extends State<WebSocketDemo> {
  final WebSocketChannel _channel = WebSocketChannel.connect(
    Uri.parse('wss://echo.websocket.org'),
  );

  @override
  void dispose() {
    _channel.sink.close();
    super.dispose();
  }

  @override
  Widget build(BuildContext context) {
    return Scaffold(
      appBar: AppBar(
        title: Text('WebSocket Demo'),
      ),
      body: Column(
        children: [
          Expanded(
            child: StreamBuilder(
              stream: _channel.stream,
              builder: (context, snapshot) {
                if (snapshot.hasData) {
                  return Text('Received: ${snapshot.data}');
                }
                return CircularProgressIndicator();
              },
            ),
          ),
          TextField(
            onSubmitted: (message) {
              _channel.sink.add(message);
            },
            decoration: InputDecoration(
              labelText: 'Send a message',
            ),
          ),
        ],
      ),
    );
  }
}

void main() {
  runApp(MaterialApp(home: WebSocketDemo()));
}
Step 7: Handling Errors
Step 7: Handling Errors
Step 7: Handling Errors
Step 7: Handling Errors
Error handling is crucial in any application, including when working with WebSockets. You can listen for errors by wrapping the StreamBuilder in a StreamBuilder that also listens for errors:
if (snapshot.hasError) {
  return Text('Error: ${snapshot.error}');
}
Step 8: Best Practices for WebSocket Communication
Reconnect Logic: Implement logic to reconnect to the server in case of a lost connection.
Heartbeat Mechanism: Use a heartbeat mechanism to check if the connection is alive.
Message Acknowledgment: Consider implementing message acknowledgment to ensure data is received.
Security: Always use secure WebSocket connections (
wss://) in production environments.
Conclusion
Conclusion
Conclusion
Conclusion
WebSockets provide an excellent solution for real-time communication in Flutter applications. In this guide, we covered the essentials of connecting to a WebSocket server, sending and receiving messages, and handling connection closures. With this knowledge, you can build dynamic and responsive applications that require real-time data exchange.
Feel free to experiment with different WebSocket servers or create your own to enhance your understanding of WebSocket communication in Flutter. Happy coding!


© 2021-26 Blupx Private Limited.
All rights reserved.
© 2021-26 Blupx Private Limited.
All rights reserved.
© 2021-26 Blupx Private Limited.
All rights reserved.