

Why Riverpod is the Best Choice for Flutter State Management
Introduction
Introduction
Introduction
Introduction
Flutter has rapidly become one of the most popular frameworks for building cross-platform mobile applications. Known for its speed, flexibility, and strong community support, Flutter is favored by developers worldwide. However, managing the app state efficiently remains one of the biggest challenges in Flutter development. This is where Flutter state management comes into play.
State management in Flutter refers to the approach used to manage the various states of your app, from simple user interactions to complex data flows. Although there are various tools available for state management, choosing the right one can significantly impact your app's performance and scalability.
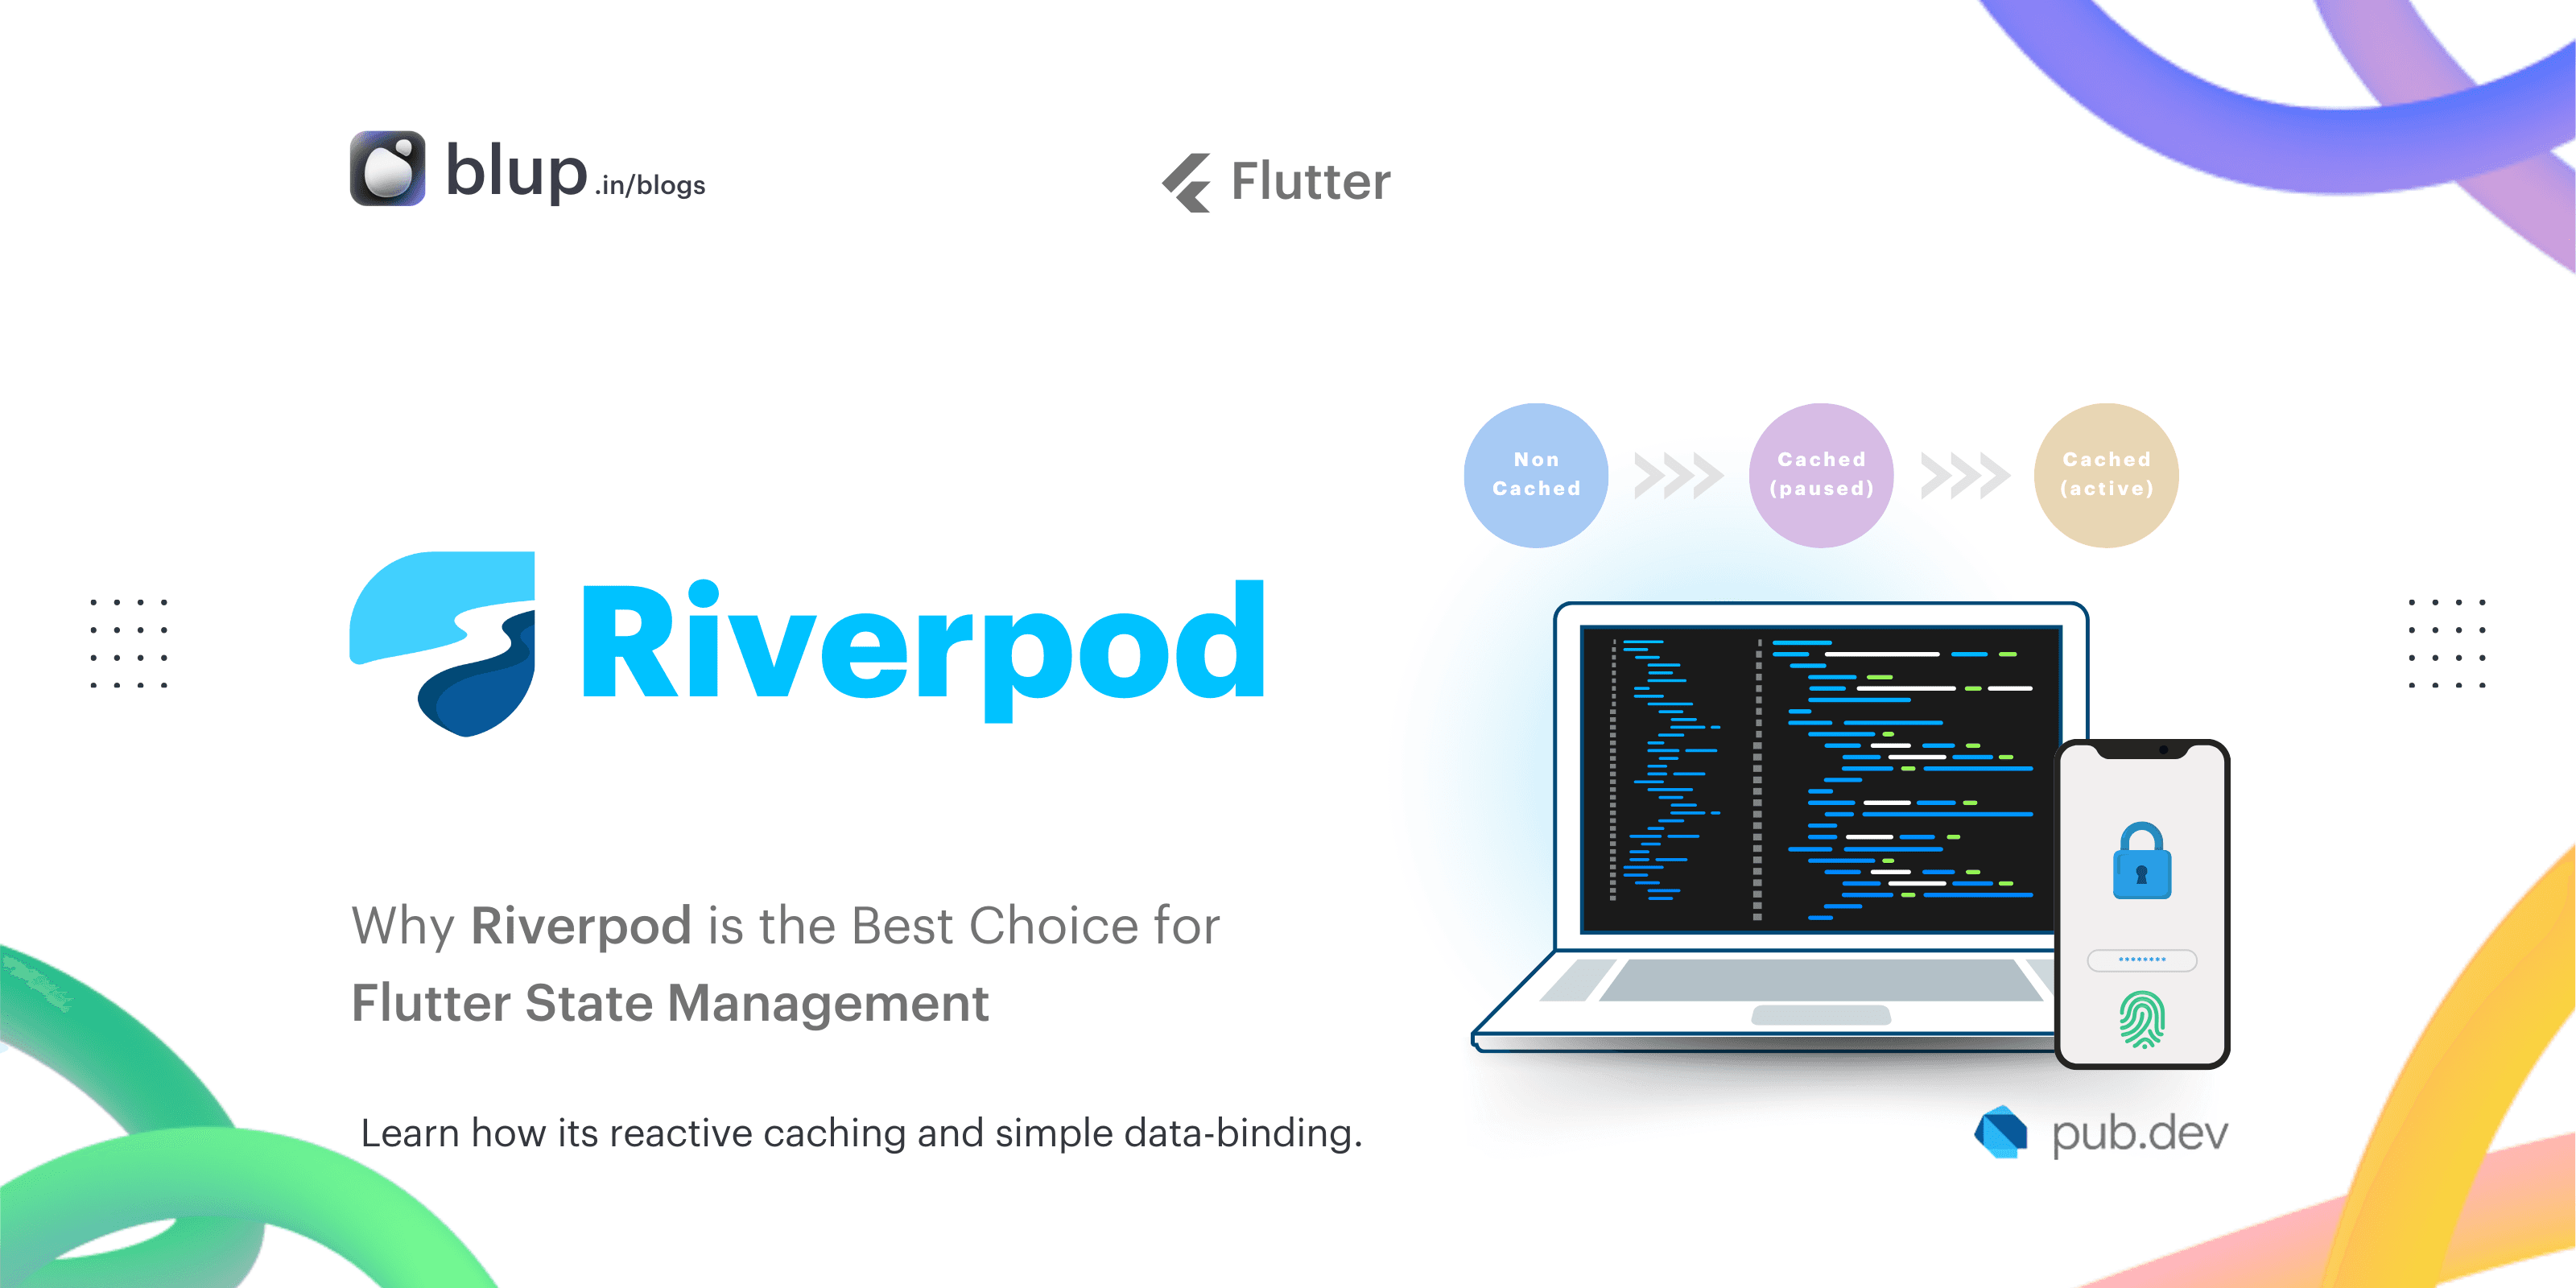
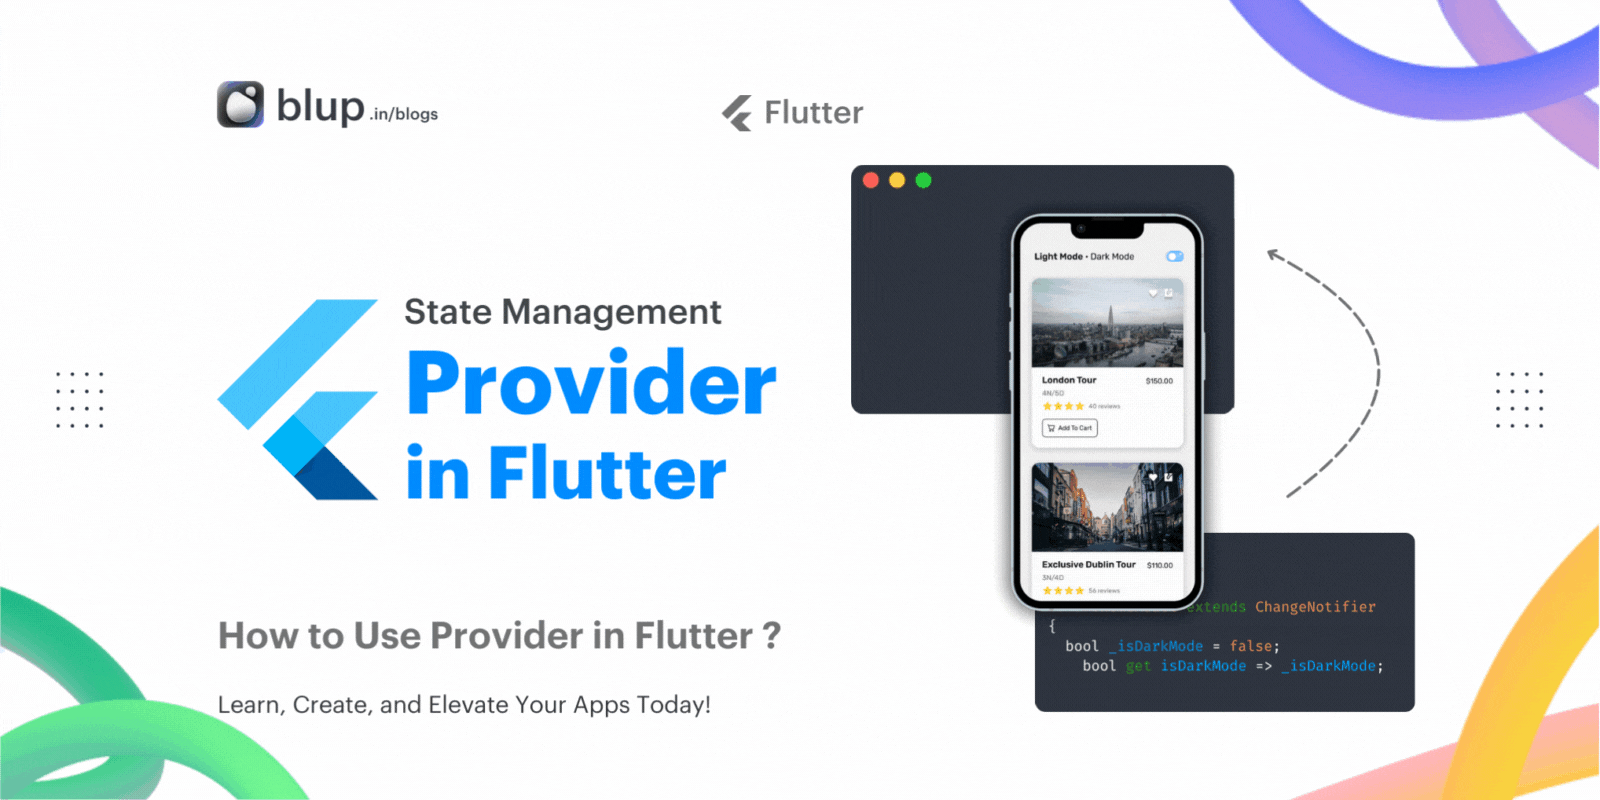
One of the most powerful tools for Flutter state management is Riverpod Flutter. Riverpod builds on top of the Provider package but offers a more robust and flexible architecture for managing the state. What sets Riverpod apart is its emphasis on reactive caching and simple data-binding, which makes your app more efficient and easier to scale.
In this blog, we will learn why Riverpod is the best choice for Flutter state management. We’ll explore how it simplifies state management, enhances performance, and makes testing easier compared to other popular solutions like Provider, Redux, and BLoC. Whether you're a beginner or an experienced Flutter developer, this guide will help you understand why Riverpod stands out as a superior solution. So, let’s get started and explore how Riverpod can transform your app development process!
Flutter has rapidly become one of the most popular frameworks for building cross-platform mobile applications. Known for its speed, flexibility, and strong community support, Flutter is favored by developers worldwide. However, managing the app state efficiently remains one of the biggest challenges in Flutter development. This is where Flutter state management comes into play.
State management in Flutter refers to the approach used to manage the various states of your app, from simple user interactions to complex data flows. Although there are various tools available for state management, choosing the right one can significantly impact your app's performance and scalability.
One of the most powerful tools for Flutter state management is Riverpod Flutter. Riverpod builds on top of the Provider package but offers a more robust and flexible architecture for managing the state. What sets Riverpod apart is its emphasis on reactive caching and simple data-binding, which makes your app more efficient and easier to scale.
In this blog, we will learn why Riverpod is the best choice for Flutter state management. We’ll explore how it simplifies state management, enhances performance, and makes testing easier compared to other popular solutions like Provider, Redux, and BLoC. Whether you're a beginner or an experienced Flutter developer, this guide will help you understand why Riverpod stands out as a superior solution. So, let’s get started and explore how Riverpod can transform your app development process!
Understanding State Management in Flutter
Understanding State Management in Flutter
Understanding State Management in Flutter
Understanding State Management in Flutter
State management is the process of managing the state or data of an app—how it changes and is maintained across different parts of the application. In Flutter, state management is critical because it ensures that the app behaves consistently, efficiently updates the UI, and maintains a smooth user experience.
Flutter provides various state management solutions, each with its strengths. Common options include Provider, which simplifies state management by using InheritedWidgets, and BLoC (Business Logic Component), which separates business logic from UI through streams. These tools are popular, but they can become complex as apps scale, leading to performance issues and convoluted code.
This is where Riverpod comes into play. As one of the best state management solutions for Flutter, Riverpod offers simplicity, reactive caching, and powerful data-binding capabilities, addressing many of the limitations found in other solutions. With Riverpod, you can efficiently manage state while keeping your code clean and easy to maintain, even as your Flutter app grows in complexity.
Choosing the best state management for Flutter is crucial for developers who want scalable, maintainable apps. Riverpod stands out by offering a better approach to handling state management with ease and efficiency.
What is Riverpod?
What is Riverpod?
What is Riverpod?
What is Riverpod?
Riverpod is a modern state management library for Flutter that simplifies how you manage app state. At its core, Riverpod is designed to make state management more intuitive and efficient by leveraging powerful features.
Core Features:
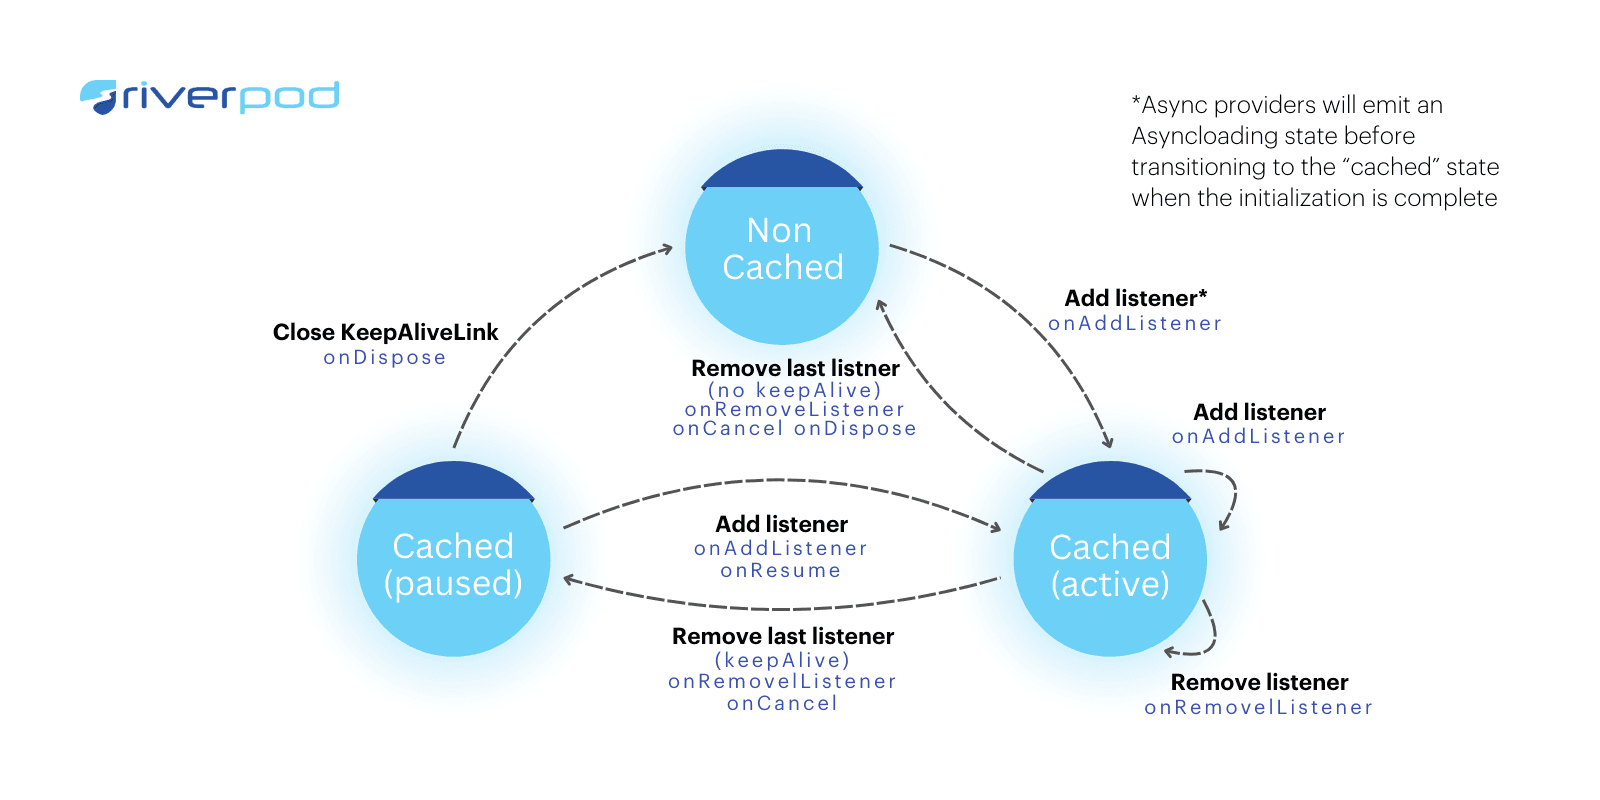
Reactive Caching: Riverpod offers reactive caching, meaning it only updates parts of your app that need it, which leads to better performance and fewer unnecessary rebuilds. This feature ensures that your app runs smoothly even as the state changes.
Data-Binding: With Riverpod, Flutter data-binding becomes straightforward. It efficiently manages the connections between your UI and state, ensuring that state changes reflect instantly in the user interface.
Simplicity: Riverpod simplifies state management by providing a clear and concise API. It eliminates the boilerplate code often associated with state management, making it easier for developers to write and maintain their code.
Riverpod vs Provider:
While both Riverpod and Provider are used for state management in Flutter, Riverpod introduces improvements over Provider. Unlike Provider, Riverpod’s approach to state management is more flexible and scalable, offering advanced features like scoped providers that enhance control and testing capabilities.
Overall, Riverpod streamlines state management in Flutter apps, offering a flexible, optimized, and simple way to handle dynamic data while improving app performance.
Riverpod is a modern state management library for Flutter that simplifies how you manage app state. At its core, Riverpod is designed to make state management more intuitive and efficient by leveraging powerful features.
Core Features:
Reactive Caching: Riverpod offers reactive caching, meaning it only updates parts of your app that need it, which leads to better performance and fewer unnecessary rebuilds. This feature ensures that your app runs smoothly even as the state changes.
Data-Binding: With Riverpod, Flutter data-binding becomes straightforward. It efficiently manages the connections between your UI and state, ensuring that state changes reflect instantly in the user interface.
Simplicity: Riverpod simplifies state management by providing a clear and concise API. It eliminates the boilerplate code often associated with state management, making it easier for developers to write and maintain their code.
Riverpod vs Provider:
While both Riverpod and Provider are used for state management in Flutter, Riverpod introduces improvements over Provider. Unlike Provider, Riverpod’s approach to state management is more flexible and scalable, offering advanced features like scoped providers that enhance control and testing capabilities.
Overall, Riverpod streamlines state management in Flutter apps, offering a flexible, optimized, and simple way to handle dynamic data while improving app performance.
Why Riverpod is the Best Choice for Flutter State Management
Why Riverpod is the Best Choice for Flutter State Management
Why Riverpod is the Best Choice for Flutter State Management
Why Riverpod is the Best Choice for Flutter State Management
Simplicity and Ease of Use: Riverpod simplifies state management by offering a clean and intuitive API. Unlike traditional state management solutions, Riverpod eliminates the need for boilerplate code and complex setup, allowing developers to focus on building features rather than managing state. Its straightforward syntax and clear documentation make it accessible even for those new to state management in Flutter.
Reactive Caching: One of Riverpod’s standout features is its reactive caching. This mechanism ensures that only the necessary parts of the UI are rebuilt when the state changes, significantly boosting performance. By avoiding unnecessary rebuilds, Riverpod helps maintain smooth and responsive user interfaces, which is crucial for delivering a seamless user experience.
Scoped Providers: Riverpod offers advanced control over the state with its scoped providers. This feature allows developers to manage the lifecycle and scope of the state effectively, making it easier to handle complex state interactions and dependencies. With scoped providers, you can isolate state changes to specific parts of your app, reducing the risk of unintended side effects.
Testing and Flexibility: Riverpod is designed with testing in mind. Its modular architecture facilitates easy testing by allowing you to mock dependencies and isolate the state. Additionally, Riverpod’s flexibility lets developers adapt it to various project needs, making it a versatile choice compared to other state management solutions. Its combination of simplicity, performance, and testing capabilities makes Riverpod a compelling option for Flutter developers.
Comparison: Riverpod vs Other State Management Solutions
Comparison: Riverpod vs Other State Management Solutions
Comparison: Riverpod vs Other State Management Solutions
Comparison: Riverpod vs Other State Management Solutions
When it comes to state management in Flutter, Riverpod stands out from other popular solutions like Provider, Redux, and BLoC.
Riverpod vs Provider: While Provider has been a go-to choice for many developers due to its simplicity, Riverpod takes state management to the next level with enhanced features. Riverpod’s reactive caching mechanism improves performance by minimizing unnecessary rebuilds, a significant upgrade over the Provider's approach. It also offers a more robust and flexible API, making state management easier to handle in complex applications.
Performance and Scalability: Riverpod excels in performance and scalability compared to Redux and BLoC. Unlike Redux, which can become cumbersome with its boilerplate code and global state management, Riverpod simplifies state management with its scoped providers, reducing the need for extensive configuration. With BLoC, while the architecture is powerful, it can be challenging to implement and maintain. Riverpod’s reactive caching and scoped state management offer a more streamlined and efficient approach, optimizing Flutter performance without compromising scalability.
Getting Started with Riverpod
Getting Started with Riverpod
Getting Started with Riverpod
Getting Started with Riverpod
Getting started with Riverpod in your Flutter app is straightforward and can significantly enhance your state management experience. Here’s a step-by-step guide to integrating Riverpod, complete with basic code examples to help you get up and running quickly.
Step 1: Add Riverpod to Your Project
First, you need to add Riverpod to your Flutter project. Open your pubspec.yaml file and include the Riverpod package. You can also add flutter_riverpod for convenience.
dependencies:
  flutter:
    sdk: flutter
  riverpod: ^2.0.0
  flutter_riverpod: ^2.0.0
After updating the file, run flutter pub get to install the package.
Step 2: Set Up Riverpod Providers
Providers are the core concept of Riverpod. They manage the state and make it accessible throughout your app. Here’s a basic example of how to define a StateProvider:
import 'package:flutter_riverpod/flutter_riverpod.dart';

// Define a simple state provider
final counterProvider = StateProvider<int>((ref) => 0);
In this example, counterProvider is a StateProvider that holds an integer state, initialized to 0.
Step 3: Use Providers in Your Widgets
To use the provider in your widgets, wrap your app with ProviderScope, which is necessary for Riverpod to manage the state:
import 'package:flutter/material.dart';
import 'package:flutter_riverpod/flutter_riverpod.dart';

void main() {
  runApp(ProviderScope(child: MyApp()));
}

class MyApp extends ConsumerWidget {
  @override
  Widget build(BuildContext context, WidgetRef ref) {
    final int counter = ref.watch(counterProvider);

    return MaterialApp(
      home: Scaffold(
        appBar: AppBar(title: Text('Riverpod Example')),
        body: Center(
          child: Text('Counter: $counter'),
        ),
        floatingActionButton: FloatingActionButton(
          onPressed: () => ref.read(counterProvider.notifier).state++,
          child: Icon(Icons.add),
        ),
      ),
    );
  }
}
Here, ConsumerWidget allows you to read and watch providers. The ref.watch method listens to the provider and rebuilds the widget when the state changes. The ref.read method is used to update the state.
Step 4: Compare Riverpod vs Provider
While Riverpod and Provider are both excellent state management solutions, Riverpod offers some distinct advantages. Unlike Provider, Riverpod doesn’t rely on the widget tree, which means it provides a more robust and flexible state management solution. It also supports advanced features like reactive caching and scoped providers, which can help optimize Flutter performance.
Step 5: Optimize Flutter Performance with Riverpod
Riverpod’s reactive caching can significantly boost your app's performance. By caching state and minimizing unnecessary rebuilds, Riverpod ensures that your app remains responsive even as it scales. This is a key improvement over Provider, which can lead to performance issues if not managed carefully.
FAQs
FAQs
FAQs
FAQs
In this section, we'll address some of the most common questions about using Riverpod for Flutter state management. These FAQs aim to clarify key points about Riverpod, such as migrating from Provider, comparing performance, and adopting best practices.
1. What are the benefits of using Riverpod over Provider in Flutter?
Riverpod offers several advantages over Provider in Flutter state management solutions. Key benefits include:
Simplicity: Riverpod’s API is more straightforward, reducing boilerplate code and making state management easier to understand and implement.
Reactive Caching: Riverpod provides advanced reactive caching mechanisms, which optimize performance by avoiding unnecessary rebuilds.
Scoped Providers: Riverpod supports scoped providers, allowing precise control over the lifecycle and scope of your state.
Testing Flexibility: Riverpod’s design makes it easier to test and mock dependencies compared to Provider.
2. How do I migrate from Provider to Riverpod in my Flutter app?
Migrating from Provider to Riverpod can enhance your state management with better features. Here’s a basic outline to guide the transition:
Update Dependencies: Replace Provider with Riverpod in your
pubspec.yamlfile and runflutter pub get.Refactor State Management: Convert your existing Provider-based code to use Riverpod’s providers. Riverpod uses
Provider,StateProvider, andFutureProviderto manage state, which might require refactoring your existing state classes and logic.Adjust Widgets: Update your widget tree to use Riverpod’s
ConsumerandProviderScopeinstead ofConsumerandProvider.of.Test Your Changes: Ensure your application functions correctly with the new state management setup, and run tests to validate that the migration hasn’t introduced any issues.
3. How does Riverpod compare in terms of performance with other state management solutions like BLoC or Redux?
Riverpod often outperforms other state management solutions due to its efficient reactive caching system. Here’s a comparison:
BLoC: While BLoC offers a strong separation of concerns and is excellent for large-scale applications, Riverpod's simplicity and reactive caching can lead to smoother performance and less boilerplate code.
Redux: Redux is powerful but can be verbose and complex. Riverpod provides similar performance benefits but with a more straightforward API, which can make development faster and easier.
4. What are some best practices for using Riverpod in Flutter apps?
To make the most out of Riverpod’s features, consider these best practices:
Use Providers Wisely: Define providers based on the scope of your state. For instance, used
StateProviderfor simple states andFutureProviderasynchronous data.Avoid Overuse: Don’t create too many providers. Instead, group-related state into a single provider to maintain clarity and manageability.
Leverage Testing: Take advantage of Riverpod’s testing features to write unit tests for your state management logic.
Keep State Management Isolated: Maintain separation of concerns by isolating state management logic from UI code, enhancing readability and maintainability.
Conclusion
Conclusion
Conclusion
Conclusion
In this blog, we've explored why Riverpod stands out as a top choice for Flutter state management. Here's a recap of the main points:
Simplicity and Ease of Use: Riverpod simplifies state management in Flutter, offering a straightforward approach that enhances developer productivity. Its intuitive API makes managing state more accessible, even for those new to state management in Flutter.
Reactive Caching: One of Riverpod’s most significant advantages is its reactive caching. This feature optimizes performance by reducing unnecessary rebuilds and efficiently managing state updates. This is crucial for creating smooth and responsive Flutter apps.
Scoped Providers: Riverpod’s scoped providers offer granular control over the state and its lifecycle. This capability allows for better organization and management of state within different parts of your app, leading to more modular and maintainable code.
Testing and Flexibility: Riverpod provides enhanced flexibility and easier testing compared to other state management solutions. This makes it a robust choice for developers who prioritize reliable and testable code.
By integrating Riverpod into your Flutter projects, you can leverage its powerful features to build efficient, scalable, and maintainable applications. If you’re looking for a state management solution that combines simplicity with advanced capabilities, Riverpod is your best bet.
Ready to explore Riverpod for your next Flutter project? Dive into Riverpod and see firsthand how it can transform your state management approach. For more insights on state management and app development, check out our related blogs and resources at Blup's Blog and Blup's Guides.
Explore more about Riverpod and Flutter state management:
By exploring these resources, you'll gain a deeper understanding of Riverpod's benefits and how to effectively implement it in your Flutter applications.
Table of content


© 2021-26 Blupx Private Limited.
All rights reserved.
© 2021-26 Blupx Private Limited.
All rights reserved.
© 2021-26 Blupx Private Limited.
All rights reserved.